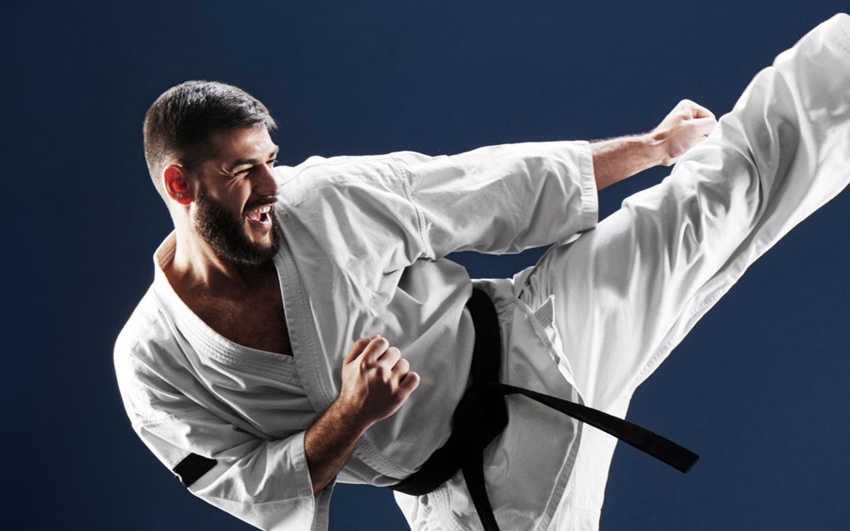
How to Kick Higher (and it’s not what you think)?
If you want to kick higher, it’s important to know that you actually need more than flexibility, you need strength as well.
In this article, I’ll explain why stretching and strengthening are essential for kicking, and I’ll also give you, for each kick, a list of carefully chosen exercises that will significantly improve your ability to kick higher.
Ok, now let’s begin with the guide.
You need more than flexibility to kick higher
I’m pretty sure you’ve been told by your Sensei that regular stretching (flexibility exercises) is the most effective way to increase kick height. Right?
Sorry to disappoint you, but he’s wrong. Well, not totally wrong, more like partially right. Let me explain. Flexibility is essential if you want to kick higher, I mean there’s no denying that, but flexibility it’s also just one of two requirements for higher kicks. There is also a strength component that comes into play.
That being said, if you cannot kick higher than waist level, it’s quite safe to say that a lack of strength is probably what’s holding you back from kicking high. I’m not saying that you’re not strong, I’m saying that some specific muscles required to deliver a particular kick might lack some strength, might not be strong enough.
So what’s the secret for delivering high kicks?
Flexibility and strength. The Yin and the Yang, you heard it before! It’s important to understand that flexibility and strength must go hand in hand.
Stretching and strengthening exercises targeted at specific muscle groups are necessary for kicking higher. Remember that your muscles work in harmony together, so flexibility affects strength and strength affects flexibility, they work synchronically.
In terms of general health, a balanced ratio between flexibility and strength allows you not only to perform functional kicks at a full range of motion but also prevents injuries and postural problems.
Other things to consider to improve your ability to kick higher
Once you work on improving your flexibility and your strength, there are some other things to consider that will help you kick higher. Here are a few:
Slow down to understand your body
Too often, we tend to do things automatically, like a robot, without being really aware of what we do. In order to improve the height at which you can kick, it is imperative to slow down, be mindful, and understand how your body works. Don’t just use your brain, feel your body. By experiencing your stretches with mindfulness, you’ll discover a lot on how this amazing machine of yours work and operate.
Develop proper biomechanics
It’s amazing how much understanding your kicks biomechanics can help improve not only their effectiveness but also their range of motion. When you deliver a kick, have an honest and mindful look at your technique. Bad posture, poor ergonomics, and improper form can cause wrong body mechanics that will result in reduced speed, power, stability, and kicking height. Some minor tweaks in your kicks biomechanic can help raise your elevation level by several inches without much effort from your part.
Just keep on kicking
The same way swimming improves your swimming ability, kicking will improve your kicking ability. Yes, you should definitely work on flexibility and strength training, but keep on doing your kicks – alone, in kihon-style, on a punching bag, on a makiwara (yes! you can kick on a makiwara) or in together with a partner.
Strengthening your core is a must to kick higher
Having a good, strong core (the muscles around your trunk and pelvis) is essential for your overall health, but also for your Karate.
Kicking makes great use of your core muscles, and sadly, core strength is often overlooked by many karate practitioners. If you’re a serious Karateka, this shouldn’t be the case, work your core!
Hundreds of years ago in the Ryukyu Kingdom – the birthplace of Karate (modern-day Okinawa), Karate practitioners knew the importance of core training and used all sorts of equipment to improve their core strength. That’s especially true with Naha-based styles like Uechi-Ryu or Goju-Ryu.
Of course, your upper and lower body should not be neglected, but you must understand that your core is the base, the center of EVERY physical movement, hence the name CORE. When you develop your core, every move becomes so much easier, trust me. Kihon, kata, kumite, everything will feel more natural and effortless! You will experience a rooting strength that will make your kicks faster, more powerful, and higher!
Core exercises improve your balance and stability
Core exercises strengthen the muscles in your pelvis, lower back, hips, and abdomen, which leads to better balance and stability, whether in the dojo or in daily activities. In fact, EVERY sport and physical activities depend on stable core muscles.
Core exercises improve your ability to lift, push, or pull your legs
As I mentioned before, every aspect of your Karate will benefit from having a strong core, but since this article focuses on kicking, let’s talk about kicks. To kick higher, you need to strengthen the muscles in the periphery of your core like your thighs hamstring and glutes, but the core muscles are mostly responsible for all the lifting, pushing and pulling involved in Karate kicks. Strengthening your core will definitely help you kick higher, whatever the kick.
Best practices to kick higher
By now, you should understand that if you want to kick higher, it is imperative that you work on both flexibility and strength.
Here, I will suggest to you three specific stretches and three specific strengthening exercises designed to improve specific kicks. I’ll focus on the three basic Karate kicks, the mae-geri (front kick), the mawashi-geri (round kick) and yoko-geri (sidekicks). So here we go.
How to know which muscles to work on for kicking higher?
If you’re not quite sure which muscles should be stretched and which muscles should be strengthened, understand this quick rule of thumb: stretch the muscles that slow down or “goes against” your motion (kick) and strengthen the muscles that help or favors this very same motion.
Important notes regarding safety
As you probably know this but let me remind you again. When you stretch, don’t go to your maximum extension right from the start, go progressively. If it starts to be too painful, release a bit of pressure and breathing through discomfort. To have the best results possible, try to hold each stretch for at least 30 seconds. Extend your range of motion progressively, it’s better to take your time than hurting yourself.
Now regarding strength exercise, breathing correctly not only help you do the movements correctly, but also help and prevent injuries. Please remember this simple rule: you exhale during the portion of the training that requires the maximum effort and inhale during the part requiring less effort. Doing the opposite can result in injuries.
How to kick higher with the Mae-geri?
As you know, the front kick or mae-geri in Japanese is the fundamental kick in every style of Karate. It is, in my opinion, the most common kick in traditional kata and the most practiced kick in traditional kihon practice.
The mae-geri is a powerful and fast kick and is “easier” to master than less “natural” kicks. Like every kick, it’s essential to perform the mae-geri with the proper biomechanics, and it’s equally important to prepare your body as well.
Stretches for the Mae-Geri
By stretching the muscles antagonist to the movement of your front-kick, you will gain, with time, the ability to not only kick higher but to kick with more power. Let’s focus on those muscles that are probably preventing you from reaching your full natural potential in terms of kicking height.
Targeted regions
Hamstrings, Glutes, Hips, Lower back.
1. Hamstrings
a) Hurdler Hamstring Stretch
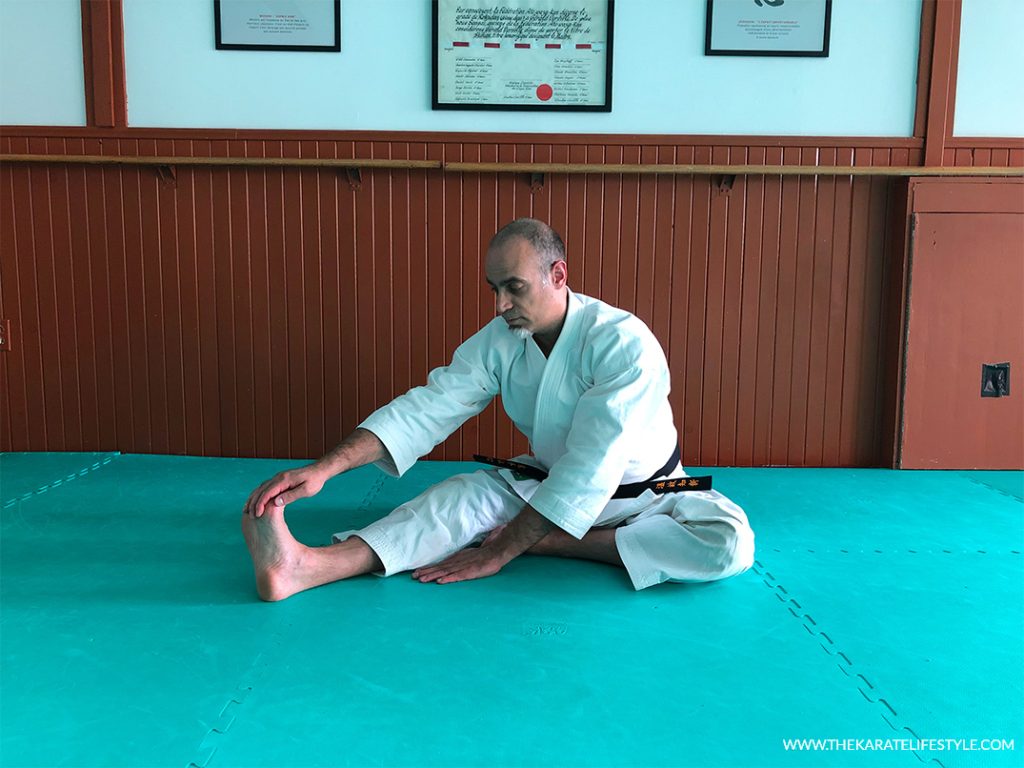
The hurdler hamstring stretch is a typical stretch in Karate, but it’s one of the best to prepare the hamstrings of kicking higher.
- Sit on the floor with one leg straight in front of you,
- Bend your other leg and put the sole of the foot against your opposite inner
- thigh,
- Extend your arms and reach forward over your straight leg (pull with your lower back first),
- Put your hands on the floor, one on each side of your leg,
- Keep the position for 30-60 seconds and repeat a few times for each leg.
b) Standing Hamstring Stretch
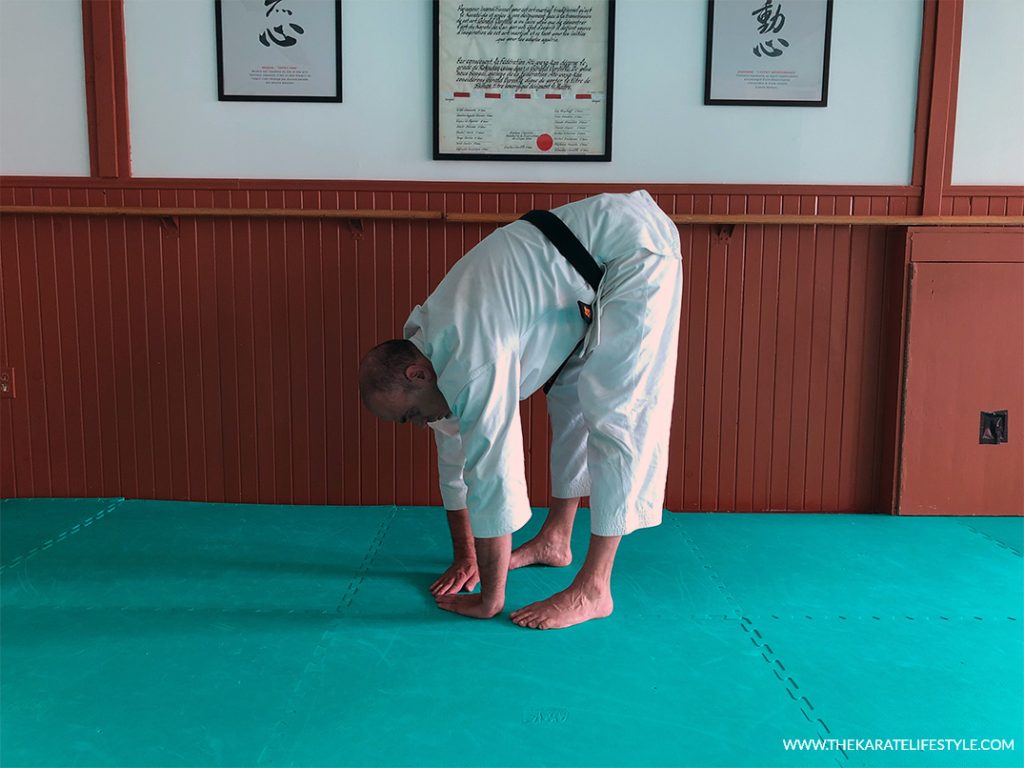
Because this stretch requires you to cross your legs, you’ll quickly realize why I have included it into this list.
- Stand tall and cross your left foot in front of your right,
- Slowly lower your body to your left knee by bending forward,
- Keep both legs straight,
- Hold this position for 30-60 seconds,
- Repeat the movement on the opposite side by crossing your right foot in front of your left.
c) Supine Hamstring Stretch
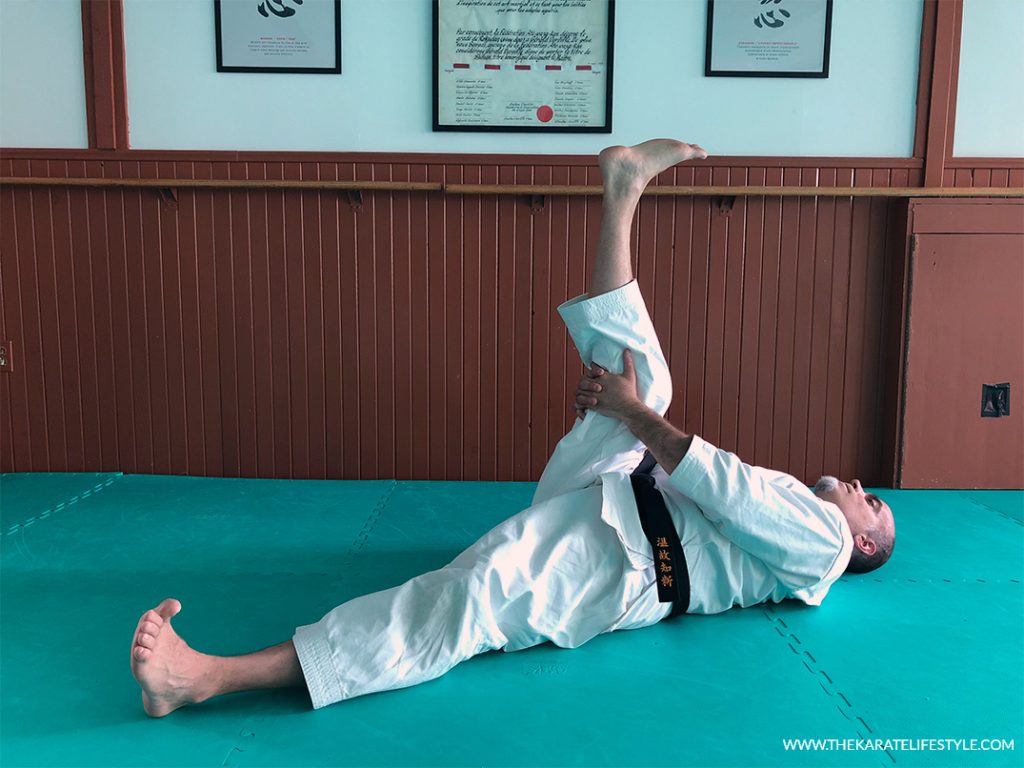
The Supine Hamstring Stretch is a great exercise. In its principle, it’s different than most stretch and it’s quite effective.
- Lie down your back, flex your hip and knee to a 90° angle,
- Put your hands behind your leg, below the knee,
- Slowly extend your upright leg towards the ceiling until you feel resistance,
- Keep your opposite leg flat on the floor,
- Keep your spine straight, and your lower back tucked to the floor,
- Hold this position for 30-60 seconds and repeat a few times for each side.
2. Glutes
a) Pretzel Stretch
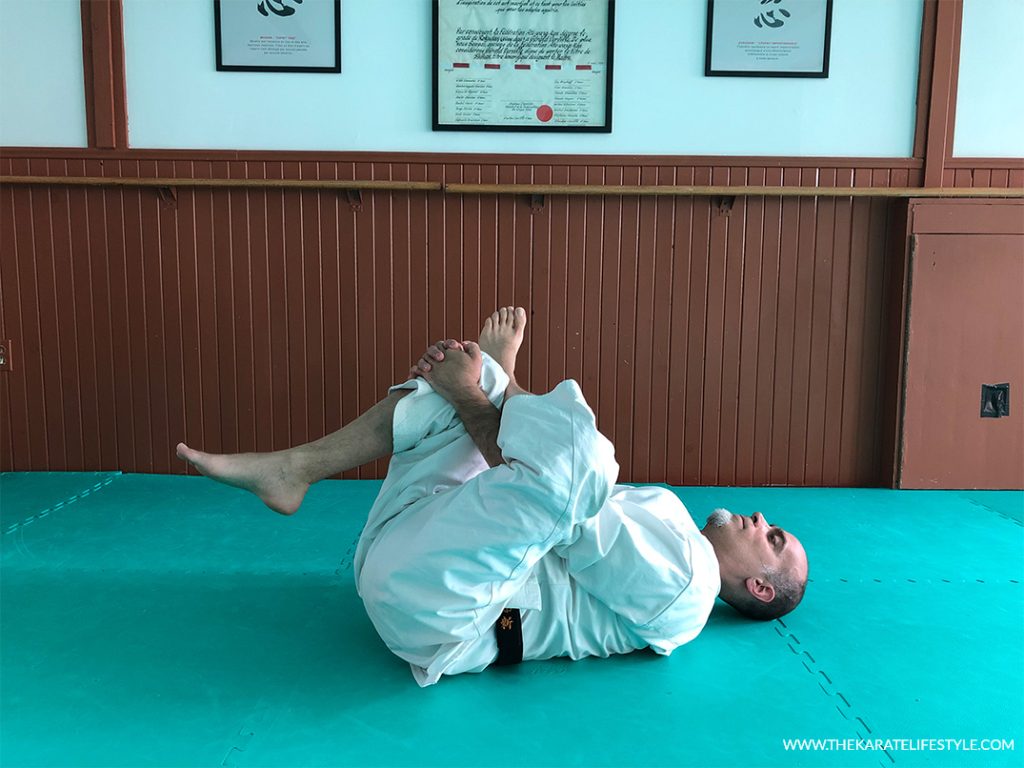
The pretzel stretch is a blessing for me, it quickly and efficiently stretches and relaxes my back and get me ready for action.
- Lie flat on your back, with both of your knees bent,
- Keep your head resting on the floor,
- Cross your right leg over your left leg so that your ankle is resting on your knee,
- Slowly pull the uncrossed leg toward your head till you feel a deep stretch in your glute,
- Hold this position for 30-60 seconds and repeat a few times for each side.
b) Knee Pull Stretch
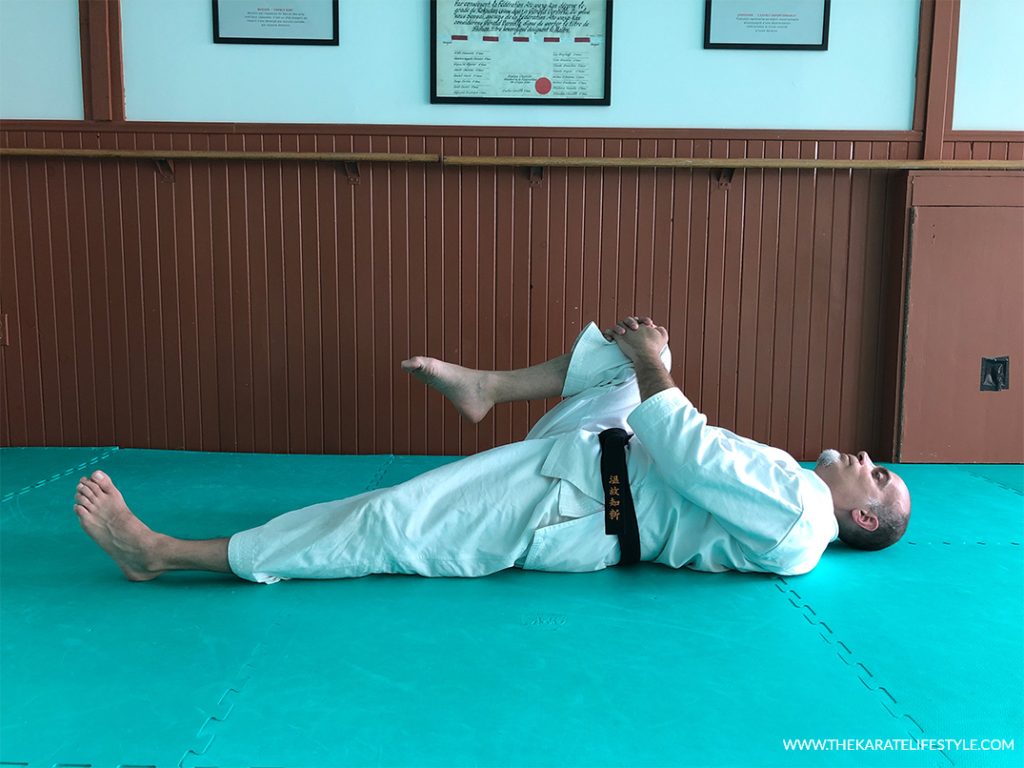
The knee pull is a simple yet important exercise for your mae-geri as it remarkably helps you reduce the friction that slows down your kick.
- Lie on your back with your legs flat on the floor,
- Gently pull one knee towards your chest and grab it with both hands,
- Keep pulling until you feel a stretch in your glutes and lower back,
- Bring your knee as close as comfortably possible to your chest,
- Keep the opposite leg extended or with your knee bent and feet flat on the floor,
- Hold this position for 30-60 seconds and repeat a few times for each side.
c) Pigeon Pose
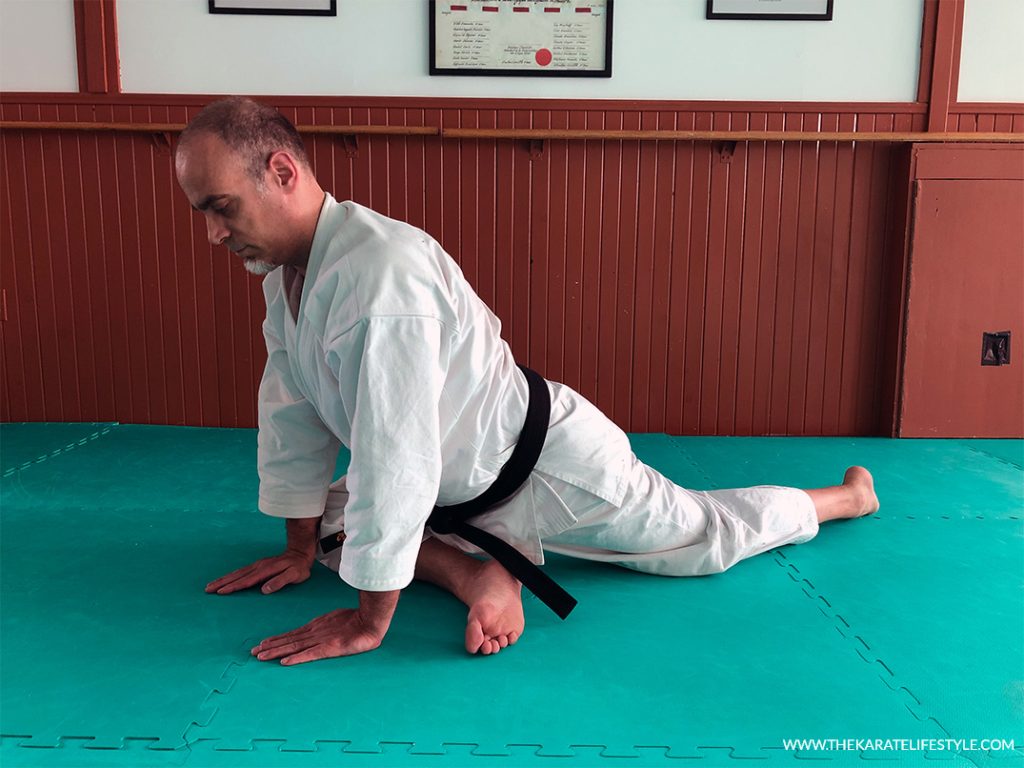
The pigeon pose is a Yoga posture and will definitely stretch your glutes and increase your hip flexors mobility enabling you to kick higher.
- Begin in push up position,
- Bring your right leg forward and twist it so that your leg rests on the floor horizontally,
- Extend your left leg behind you, keeping your hips pushing toward the floor,
- Hold this position for 30-60 seconds and repeat a few times for each side.
3. Hips stretches
a) Kneeling Stretch
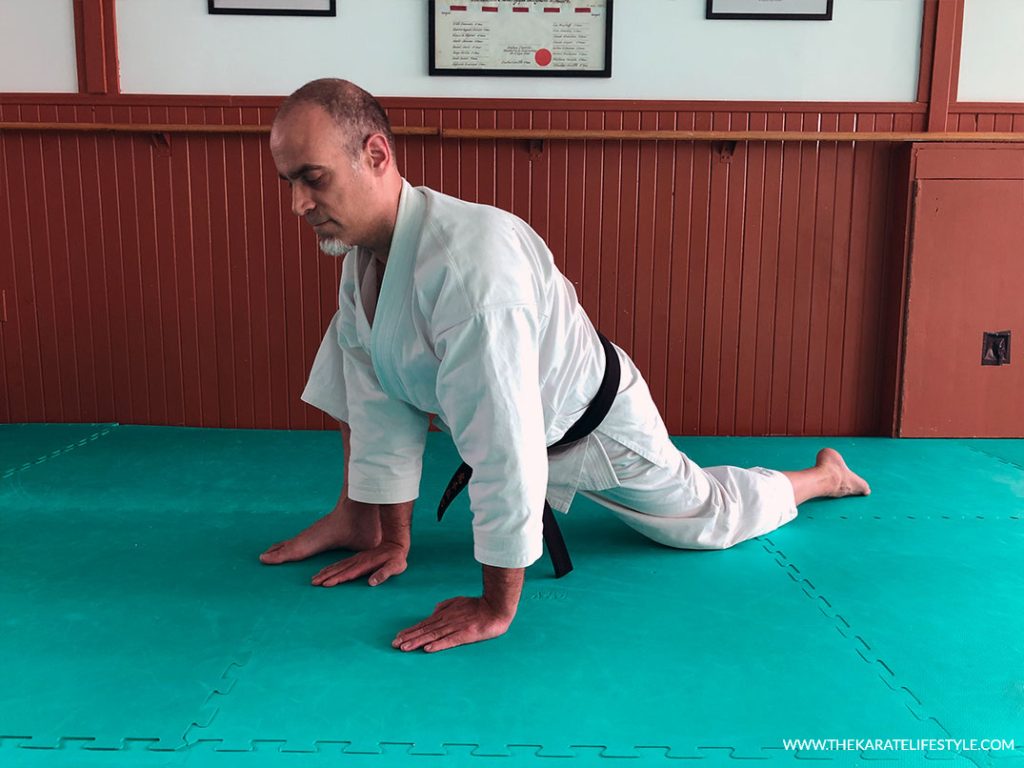
The kneeling stretch a great tool to add to your arsenal of stretches for the front-kick.
- Kneel down on the floor with one of your knees and extend your other leg at a 90° angle in front of you,
- Put your hands on the floor, one on each side of your foot,
- Keeping your rear leg pressed against the floor,
- Lean your hips forward, towards your front leg,
- Hold this position for 30-60 seconds and repeat a few times for each side.
b) Lying Hip Rotation
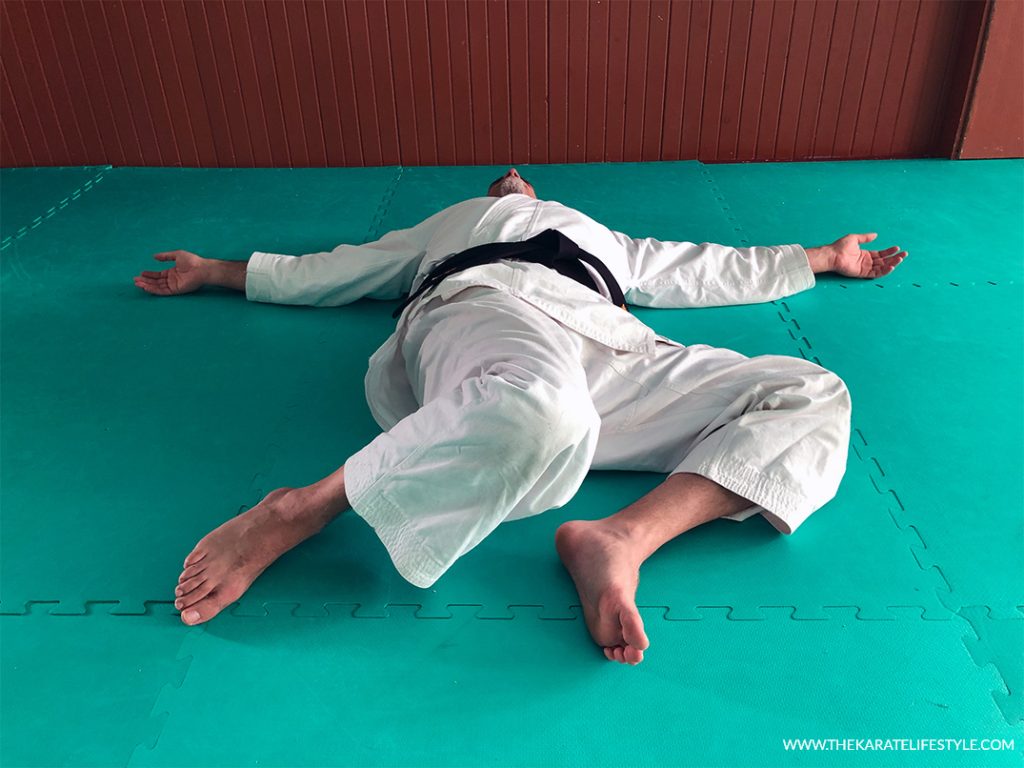
The Lying Hip Rotation is a simple but effective method of stretching your hips, glutes, and lower back.
- Lie down on your back,
- Bend your knees and put your feet a bit wider than your hips,
- Have your legs “fall” on the side (this can also be done with the legs together ),
- Hold this position for 30-60 seconds and repeat a few times for each side.
c) Butterfly
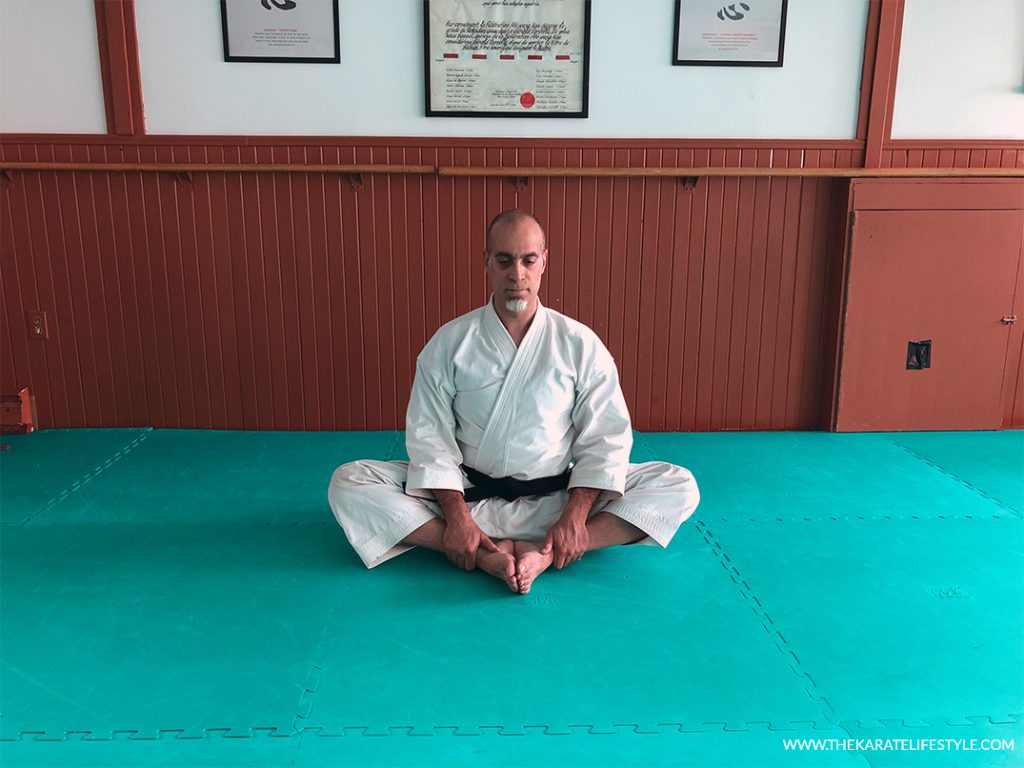
The butterfly stretch opens and stretches the hip adductors – an important muscle used in kicking.
- Sit on the floor with your back straight and put the soles of your feet pressed together,
- Let your knees “fall” naturally to the sides (don’t push),
- Grab your ankles and pull yourself forward until you feel a slight stretch,
- Keep grabbing and bring down your elbows on your knees,
- Hold this position for 30-60 seconds and repeat a few times for each side.
4. Lower back
a) Inverted Lotus

The inverted lotus it one of my favorite exercises for stretching and relaxing the lower back. I do it every morning in bed before getting up.
- Lay down on your back and cross your legs,
- Grab up towards your feet and pull them towards your chest, keep your back flat on the ground,
- Let your forearms rest on your shin,
- Hold this position for 30-60 seconds and repeat a few times for each side.
b) Lower Back Rotational Stretch
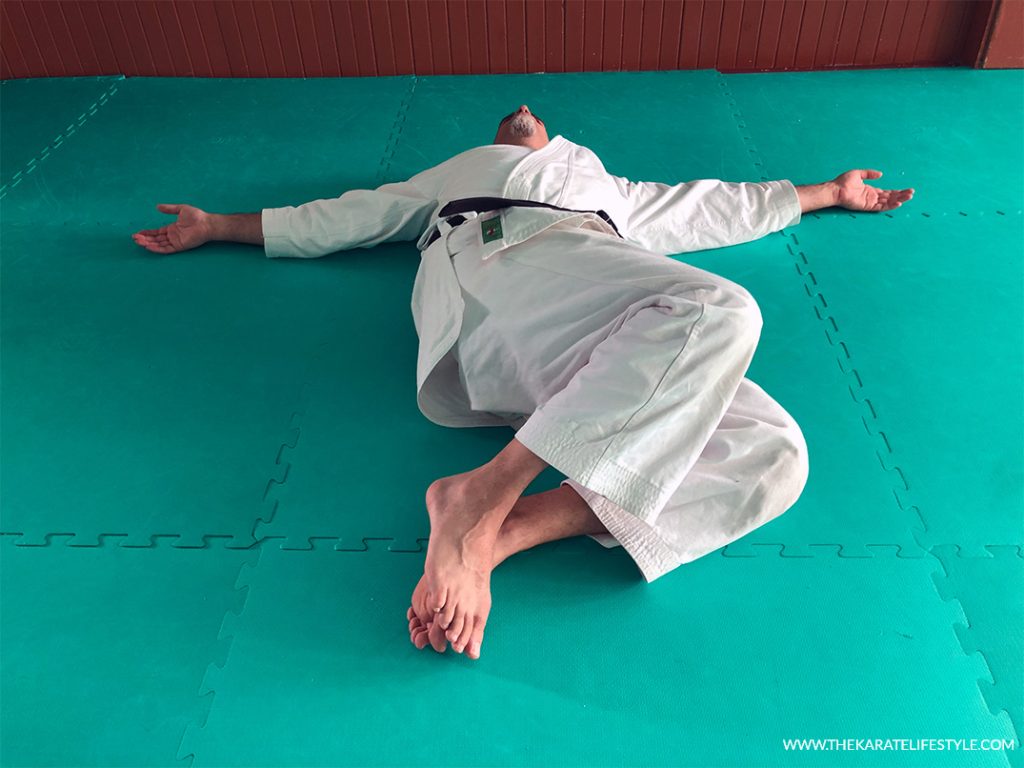
The lower back rotational stretch is a fantastic exercise to perform to help improve your kicks. It helps relieve tension in the lower back and trunk. It also gently works the core muscles to improve stability and kicking ability.
- Lie down on the floor and bend your knees, keep your feet flat on the floor,
- Extend your arms horizontally on each side of your body,
- Keep your shoulders firmly on the floor, gently roll both bent knees over to one side,
- Return to the starting position,
- Take deep breaths, hold this position for 30-60 seconds, and repeat a few times for each side.
c) Sumo Squat Stretch
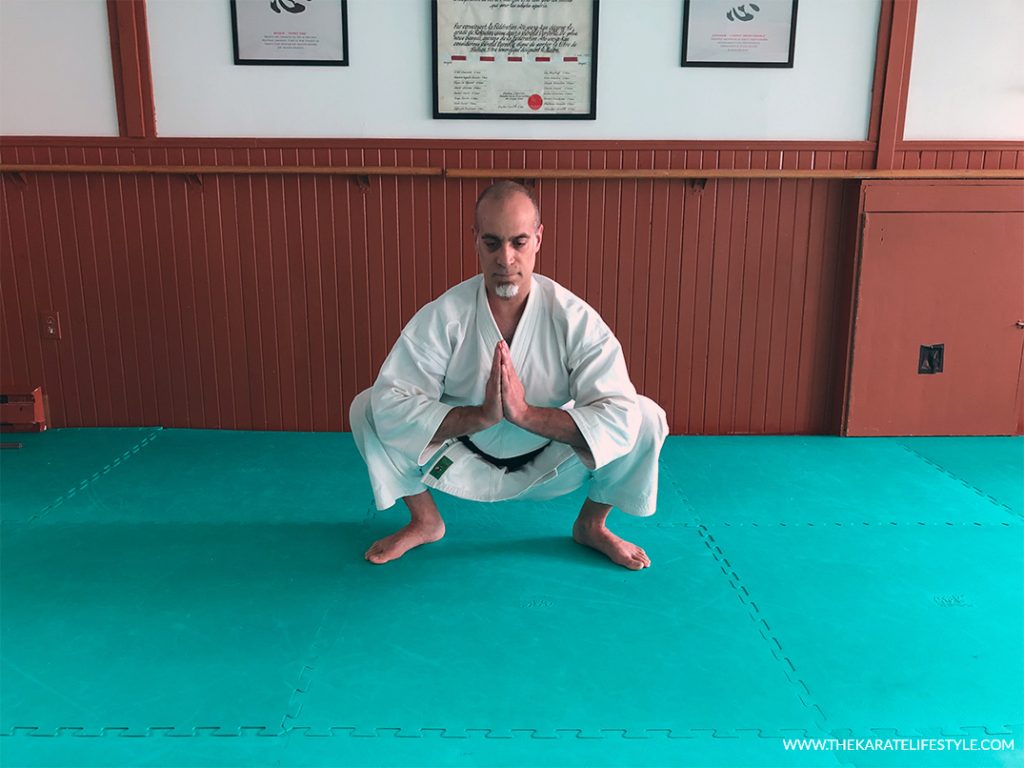
The sumo squat stretch is a fantastic posture not only to stretch your lower back, but also to relieve lower back pain. For me, it’s the mother of all posture.
PS: In Japan (especially in Okinawa), you’ll see lots of people crouching on the streets while waiting for the bus, chatting and relaxing.
- Put with your feet about shoulder-width apart, toes angled out at 45°,
- Squat down so that your knees are bent and thighs are more or less parallel to the ground,
- Rest your elbows on your knees,
- Drop your hips to the ground, keeping your back relatively straight,
- Take deep breaths, hold this position for 3-5 minutes (yes minutes!).
Strengthening exercises for the Mae-Geri
If your aiming to kick higher with your mae-geri, your body requires a certain level of strength specifically in the hips, tight and core. Here are a series of strengthening exercises that will help with your mae-geri.
Targeted regions
Hips, Thighs (front), Core.
1. Hips
a) Standing Knee Raise (ideally with a resistance band)
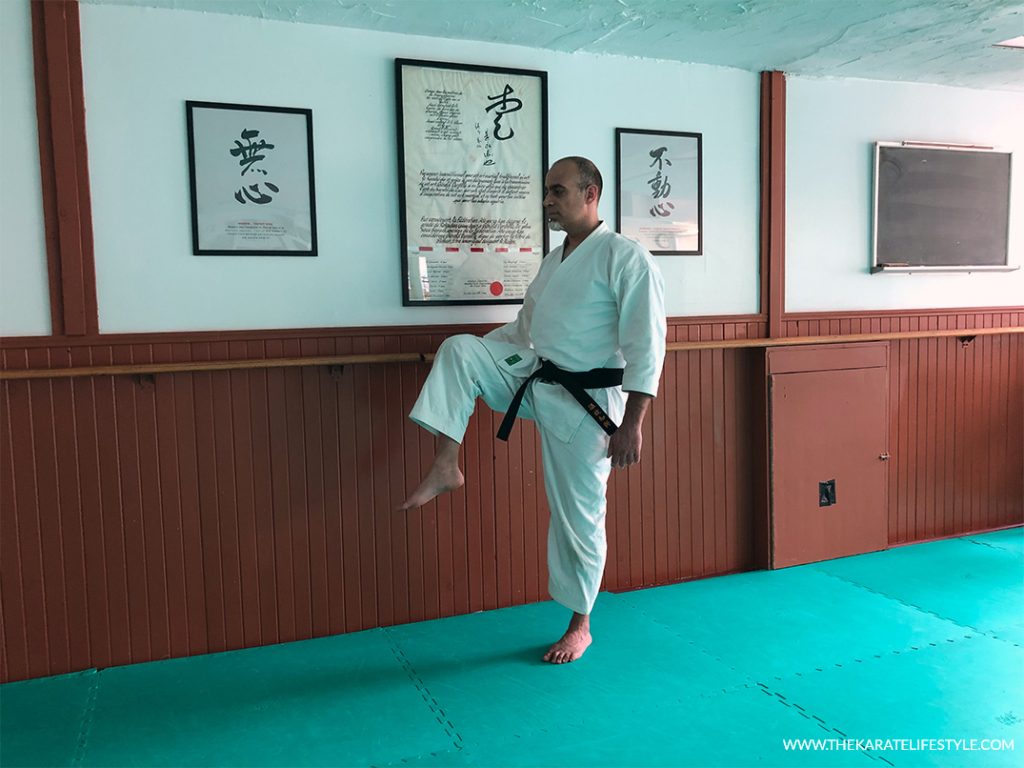
I suggested this exercise to many MANY people struggling with their front kick, some of them could barely kick above the belt. I can tell you that they all got amazing results with this exercise. Don’t let its simplicity fool you, this exercise it works!
- Stand tall with your feet apart around hip-width,
- Keep your arms resting freely at your sides,
- Moderately tense up your core and slowly raise your knee upward as far as you can go,
- Pause at your maximum and maintain the posture for 30-45 seconds and repeat a few times for each side.
- PS: Ideally, I’d suggest doing this exercise with a resistance band , you’ll see amazing results with your front kick.
b) Single Leg Bridge
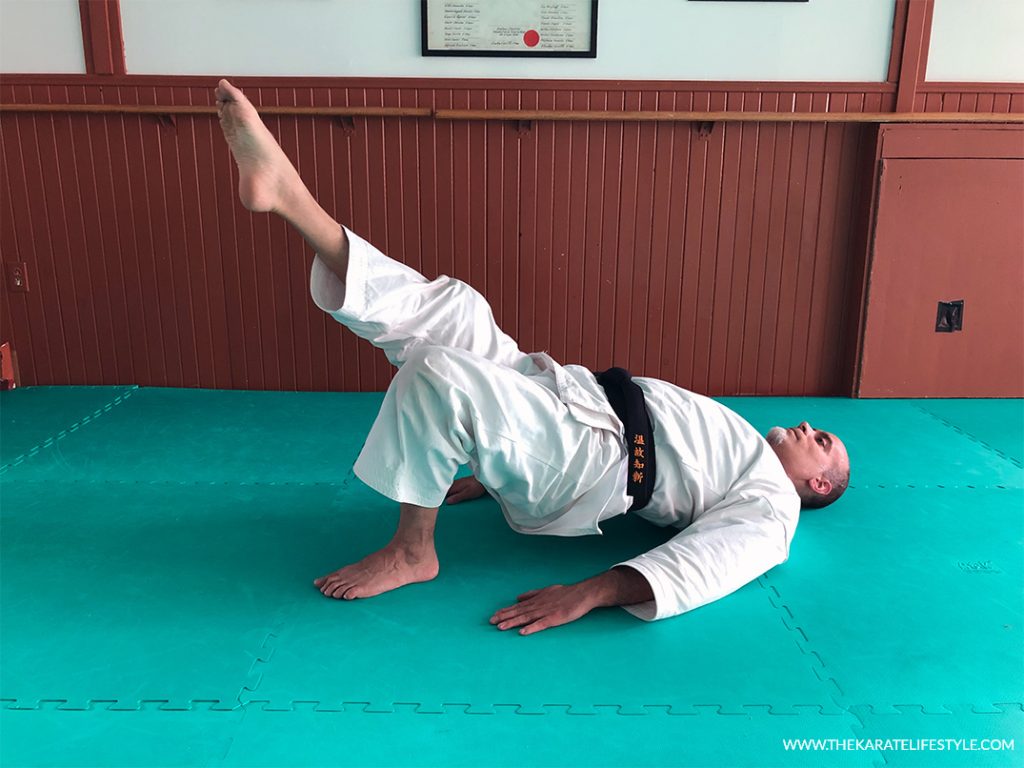
The single leg bridge exercise is excellent to work (isolate and strengthen) the hip abductor, the glute muscles, and also the hamstrings.
- Lie down on your back with your knees bent and feet flat on the floor. Keep your arms along your body,
- Engage your abdominal muscles and lift one leg about 15 inches off the floor,
- Keep your core tight and your leg up, slowly lift your buttocks until you make a bridge with your body,
- Hold the position for 5-10 seconds then slowly bring your glutes down,
- Repeat this exercise for a 10 total repetitions on each side.
c) Frontal Leg Raise
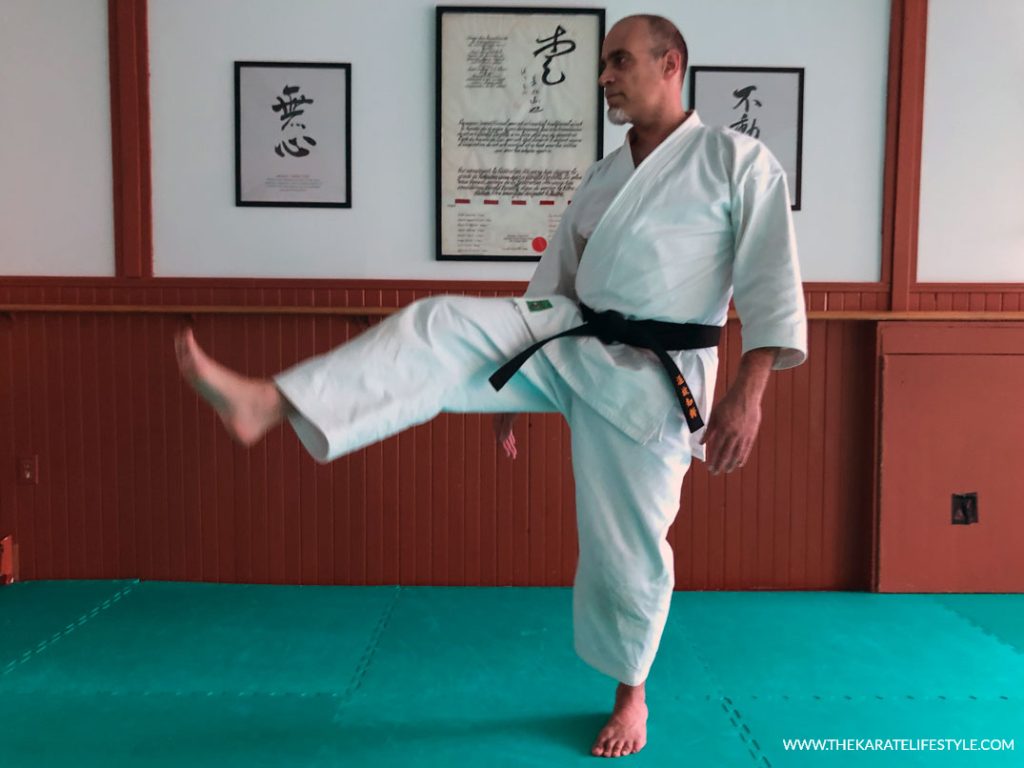
It’s pretty easy to understand why the frontal leg raise is an excellent exercise for strengthening your muscles for the front-kick: it works on the same muscles as the mae-geri.
- Stand with your feet shoulder-width apart,
- Put your hands behind your head with your elbows out to the sides,
- Bend your knees and squat down as far as you can,
- Come back up and extend your right leg in front of you, foot flexed,
- Repeat this exercise (alternate) for 10 total repetitions on each side.
2. Tights
a) Bodyweight Squat
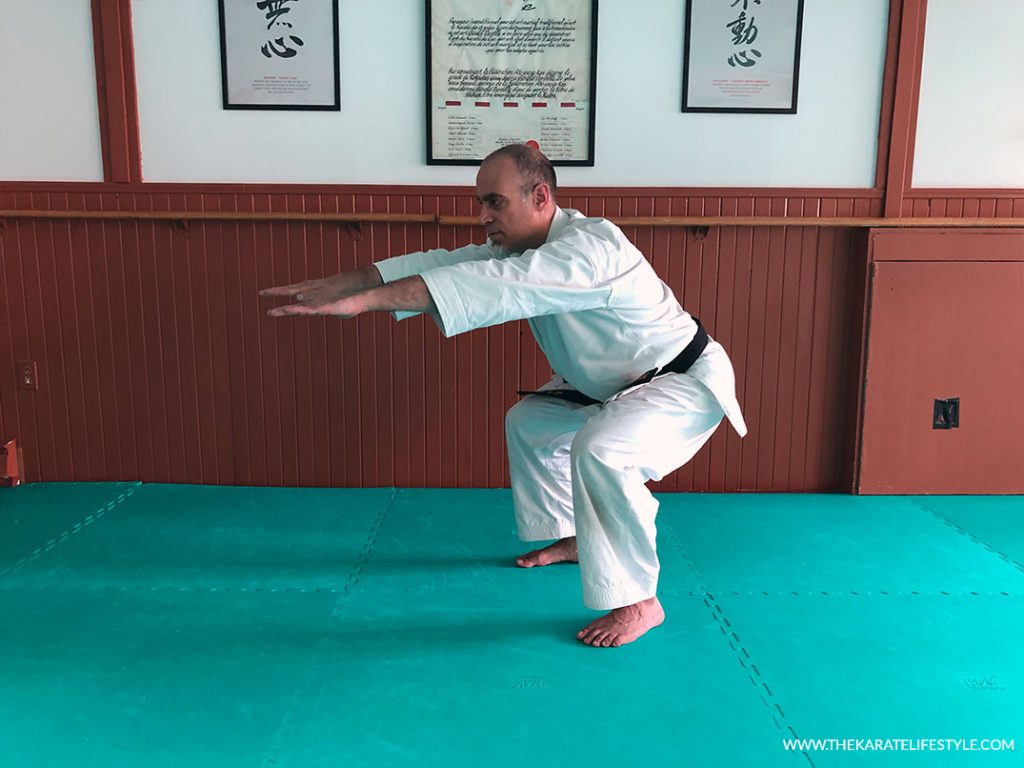
The bodyweight squat is a great exercise to help strengthen your tights but also your glutes, lower back, and core. It’s a great way to get powerful kicking legs!
- Stand with your feet shoulder width apart,
- Place your hands behind your head,
- Squat down by bending your knees and hips, then come back up,
- As you squat, keep your head and back straight and push your knees out,
- Repeat this exercise for 10 total repetitions.
b) Front Lunges (ideally with dumbbell)
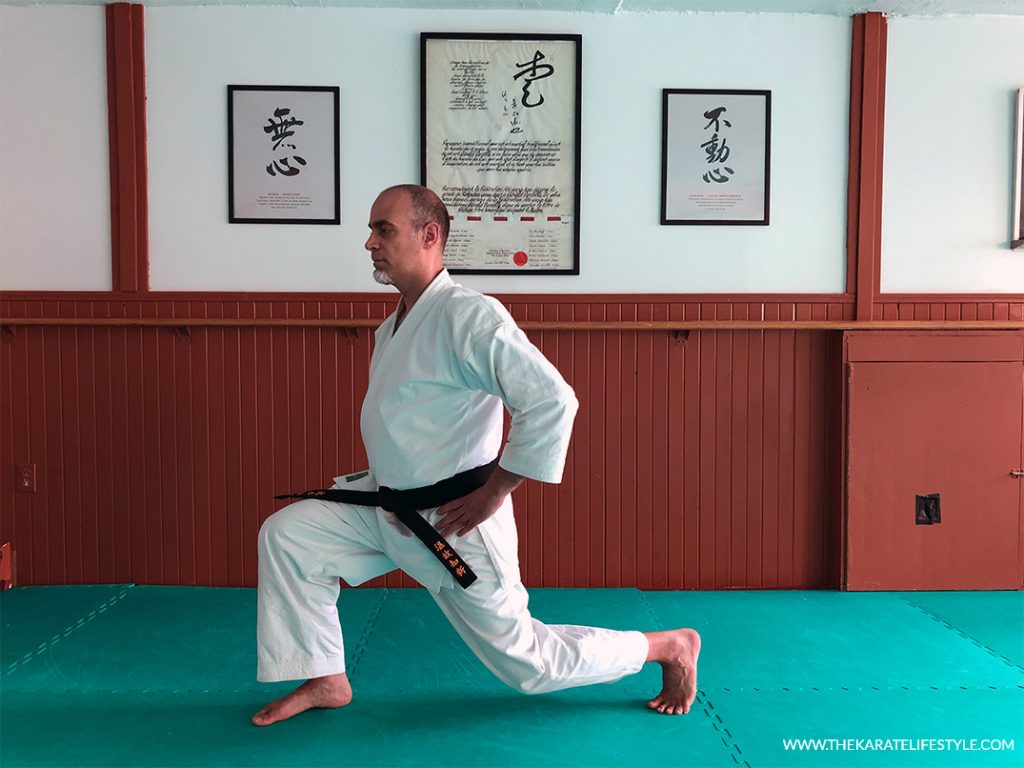
The lunge is a single-leg bodyweight exercise that’ll work not only on your tight but also your hips, glutes, quads, hamstrings, and core. It’s a great workout that will strengthen your body so that you can deliver your high mae-geri.
- Stand tall with feet hip-width apart,
- Take a large step forward with one of your legs and shift your body weight forward,
- Go low until your thigh is parallel to the floor and right shin is vertical,
- Push on your front leg to go back to your initial position,
- Repeat this exercise for 10 total repetitions on each side.
c) Horse-Stance Squat

The horse stance is practiced in almost every Karate and Kung-Fu styles for a reason – it works! You will develop legs of steel with this demanding yet straightforward exercise.
- Stand tall and put your feet apart, about one 12 inches wider shoulder width,
- Keep your feet are parallel and facing forward,
- Keep your back and neck is straight and tall,
- Bend your knees and lower the upper body as if you were sitting on horseback,
- Tilt your pelvis upward,
- Hold the position for 30-60 seconds, and repeat 5-10 times.
3. Core
a) Crunch
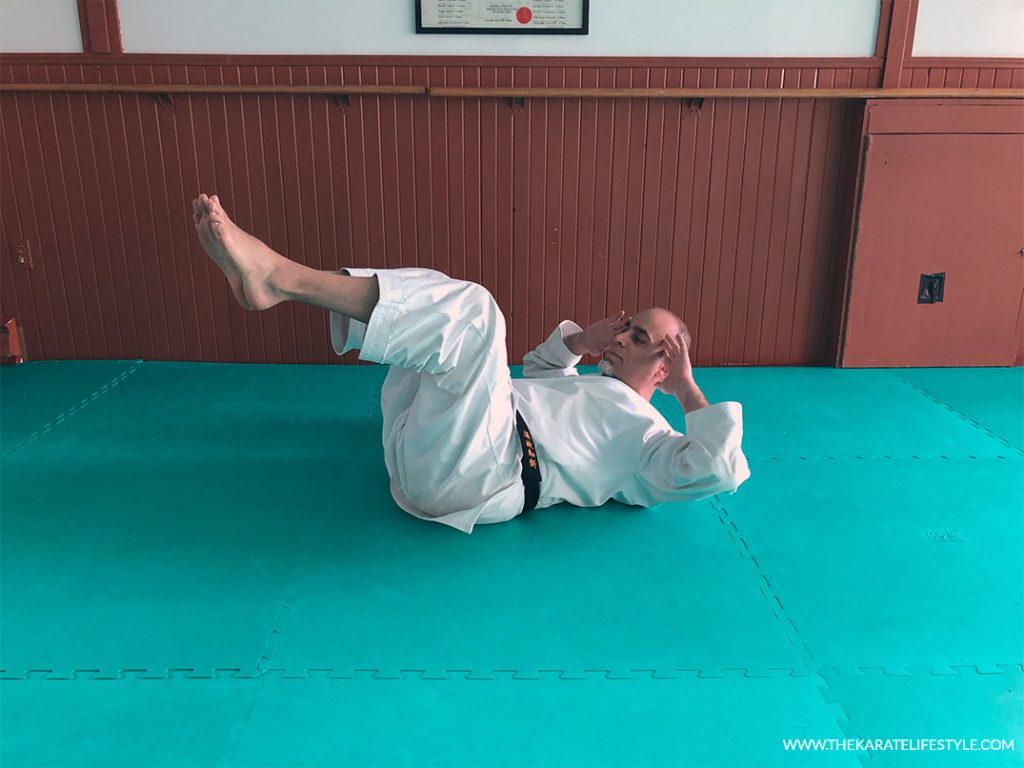
Crunches are an easy and effective way to strengthen your abdominal muscles. They’re similar to sit-ups, but instead of lifting your entire back off the floor, you only lift your upper back.
- Lie down on the floor on your back and flex your knees, Placing your hands behind your head (gently support your head, but don’t pull) or crossed on your chest,
- Lift your back about 2 or inches off the floor,
- Keep your head and neck straight and your chin up,
- At the top of the movement, hold the position for a few seconds,
- Slowly go back to your initial position (back on the floor), but don’t relax all the way,
- Do 3 to 5 series of 15 to 20 repetitions.
b) Reverse crunch
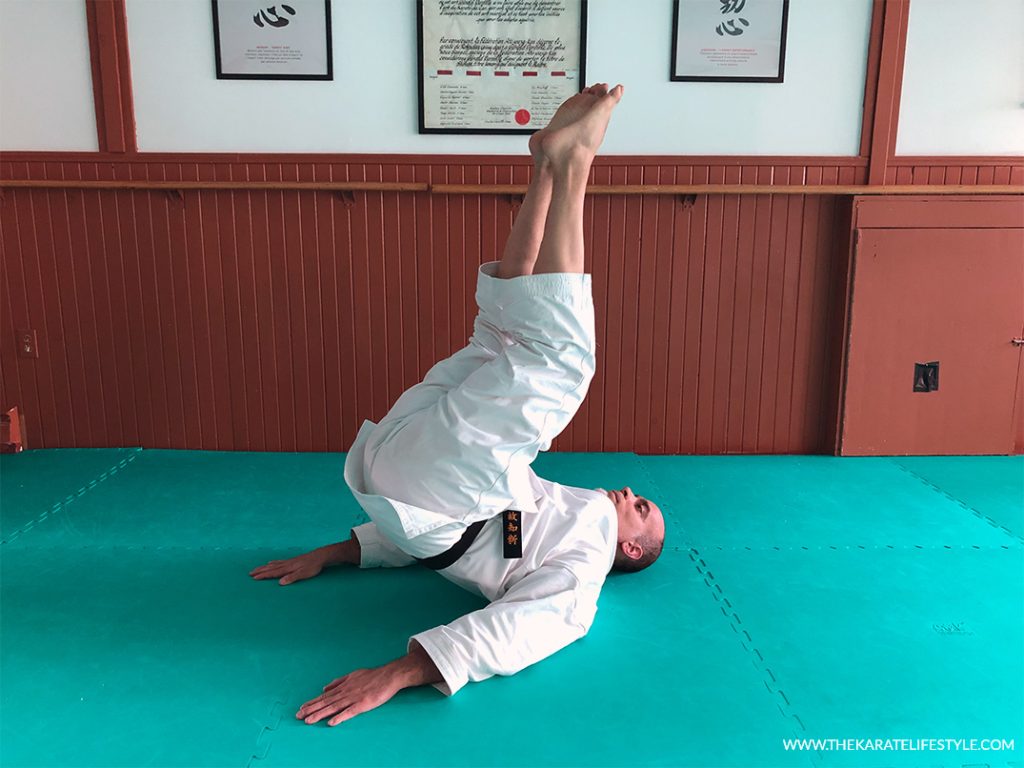
The reverse crunch is a core exercise that essentially works on the inferior portion of your rectus abdominus (a.k.a. the six pack abs), the part of your core mainly used when delivering the mae-geri. The rectus abdominis also improve stability throughout the lower back, hips, and spine.
- Lie down on your back with your legs fully extended,
- Put your arms along your sides, palms down,
- Lift your legs up like if you were trying to push the sky with your feet,
- Make sure you raise your hips and upper back off the floor,
- Hold the posture for 1-2 seconds, then bring your legs back to the starting position,
- Do 3 to 5 series of 15 to 20 repetitions.
c) Ab Roller

Of course, you can do abs without equipment, but the ab roller will help you perform some of the most challenging core exercises out there. Not only that, the ab roller is incredibly effective is its ability to engage your entire core and some hard to reach, deep muscles.
- Grab the Ab Roller with two hands and kneel on the floor,
- Put the Ab Roller in front of you, on the floor,
- Slowly roll the Ab Roller forward in a straight line, extending your body in the process,
- Go close to the floor as far as you can without touching it,
- Once extended, pause for half a second then pull yourself back to the starting position,
- Go slowly and contract your abs at all times,
- Do 3 to 5 series of 10 to 15 repetitions.
How to Kick Higher with the Mawashi-Geri?
Because your kicking leg swings in an arc from outside to the inside, your core and hip muscles need to be strong and you supporting leg muscles need to be flexible enough to allow you to tilt your body without any pain, discomfort, and restriction due to tight muscles.
Stretching exercises for the Mawashi-Geri
As you know, the round kick requires you to have flexible hamstrings for your supporting leg (the leg on the ground) but also flexible hips to deploy the kick correctly.
Targeted regions
Hamstrings (supporting leg), Inner thighs, Hips (rotation).
1. Hamstrings / Tight (supporting leg)
a) Hurdler Stretch (round kick variation)
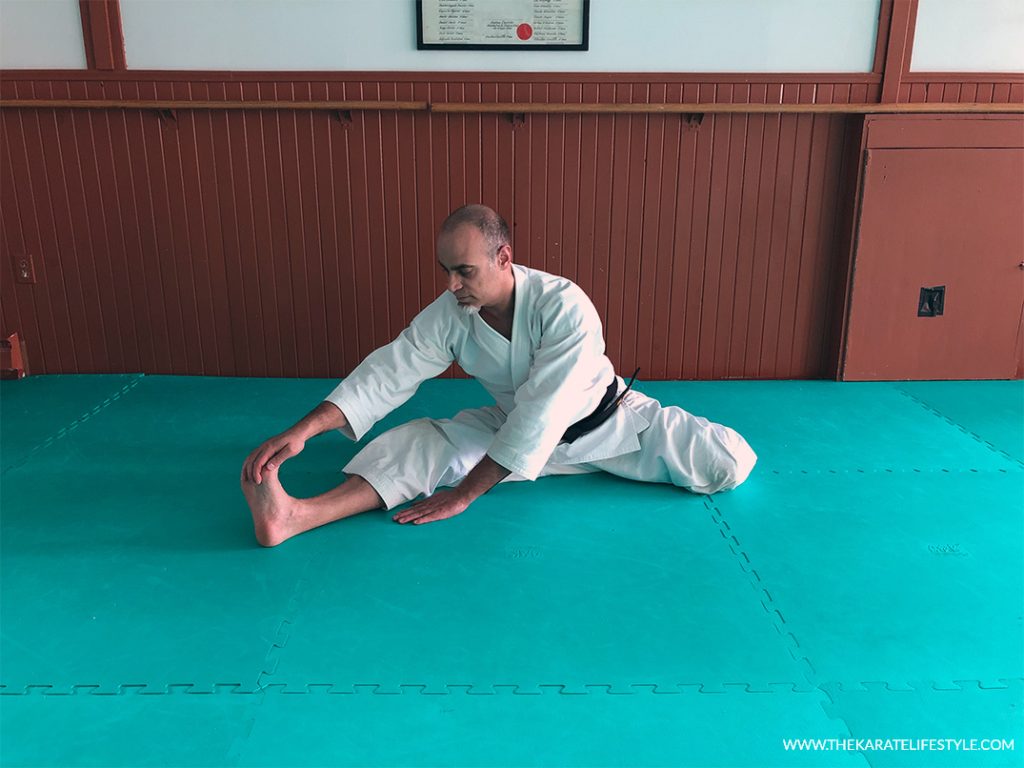
This version of the hurdler’s stretch is excellent for improving the flexibility of your mawashi-geri. This variation is an excellent way to stretch your hamstrings and inner thigh muscles.
- Sit on the floor with both legs widely open,
- Fold one leg and keep the other extended in front of you,
- Bend forward towards your extended leg and hold it with both hands,
- Hold the position for 30 to 60 seconds, and repeat a few times for each side.
b) Side Lunge Stretch
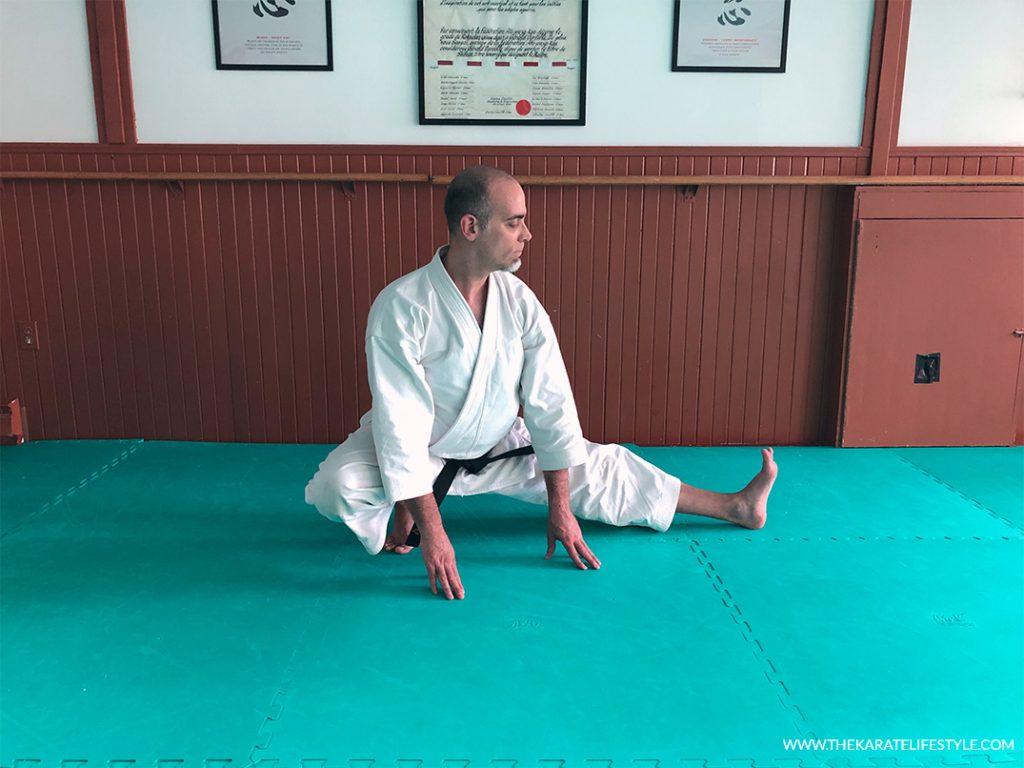
This stretch works on your hamstrings as well as your adductors, the muscles on the inside of your thighs, that help uphold your hips during the round kick.
- Stand upright, spread your legs double shoulder-width apart,
- Bend over and put your hands in front of you, on the floor,
- Lunge out to one side, your foot should be pointing towards the sky at all times,
- Keep your leg straight as much as you can,
- Hold the position for 30 to 60 seconds, and repeat a few times for each side.
c) One Leg Stretch
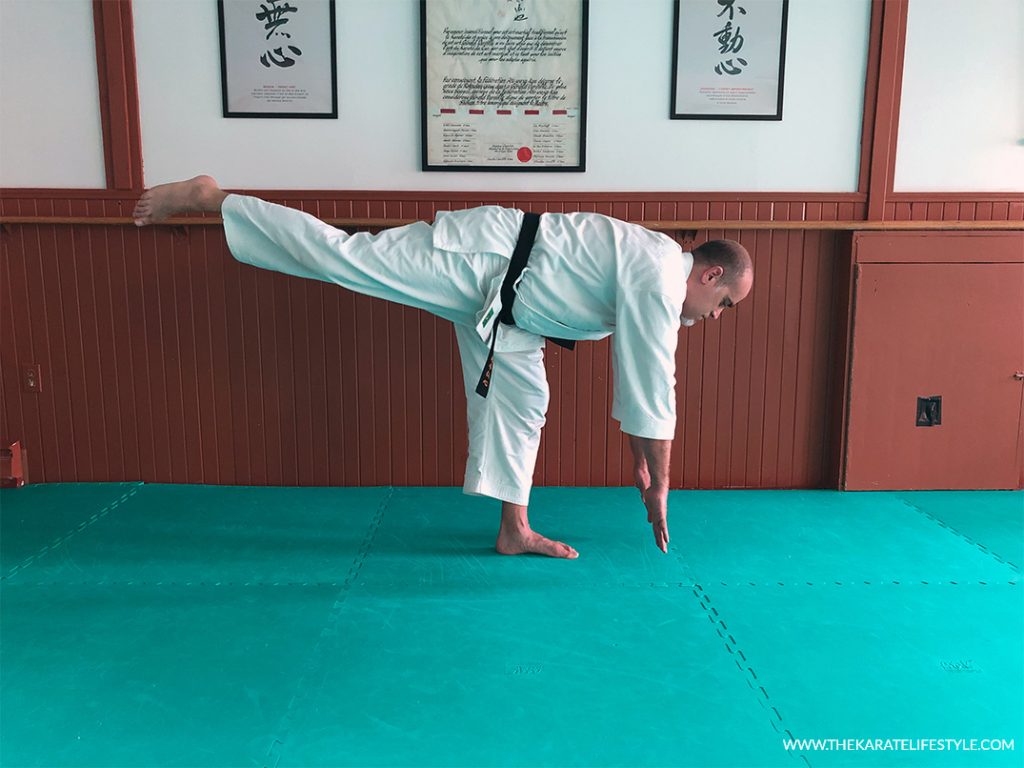
This exercise will stretch not only your hamstrings and inner thighs but also your core stabilizers. It will also work on your balance, an essential element for kicking.
- Start with an upright posture, stand tall and relaxed,
- Slowly bend forward and try to touch your toes,
- At the same time, lift one of your legs your straight behind you as you,
- Hold the position for 15 to 30 seconds, and repeat a few times for each side.
2. Inner thighs
a) Frog Stretch
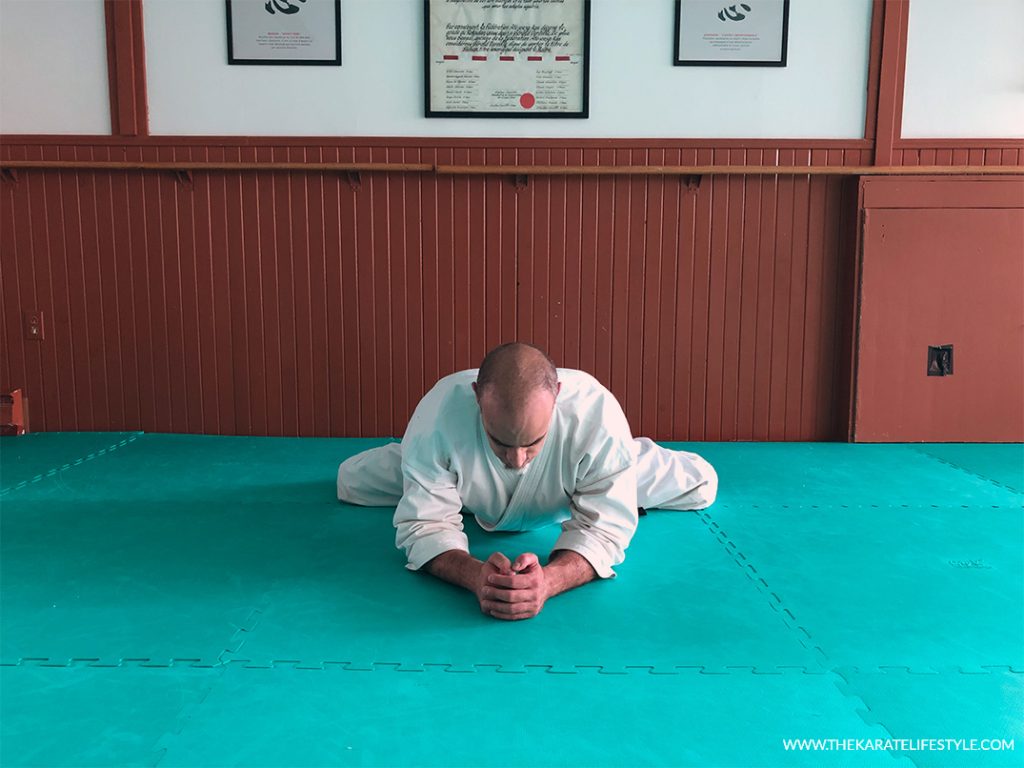
The frog stretch is really a great exercise to gain flexibility in your inner thighs and hips, a must for delivering higher mawashi-geri or round kicks.
- Begin the exercise on all four (on your hands and knees), Open your knees as far apart as it’s comfortable,
- Keep the position and move back and forth 10 times,
- If flexibility allows, try bringing your pelvis closer to the floor to emphasize hips opening,
- Keep your feet together to prevent damaging the knee articulation,
- Repeat 3 to 5 times.
b) Side Lunge for the Inner Thigh
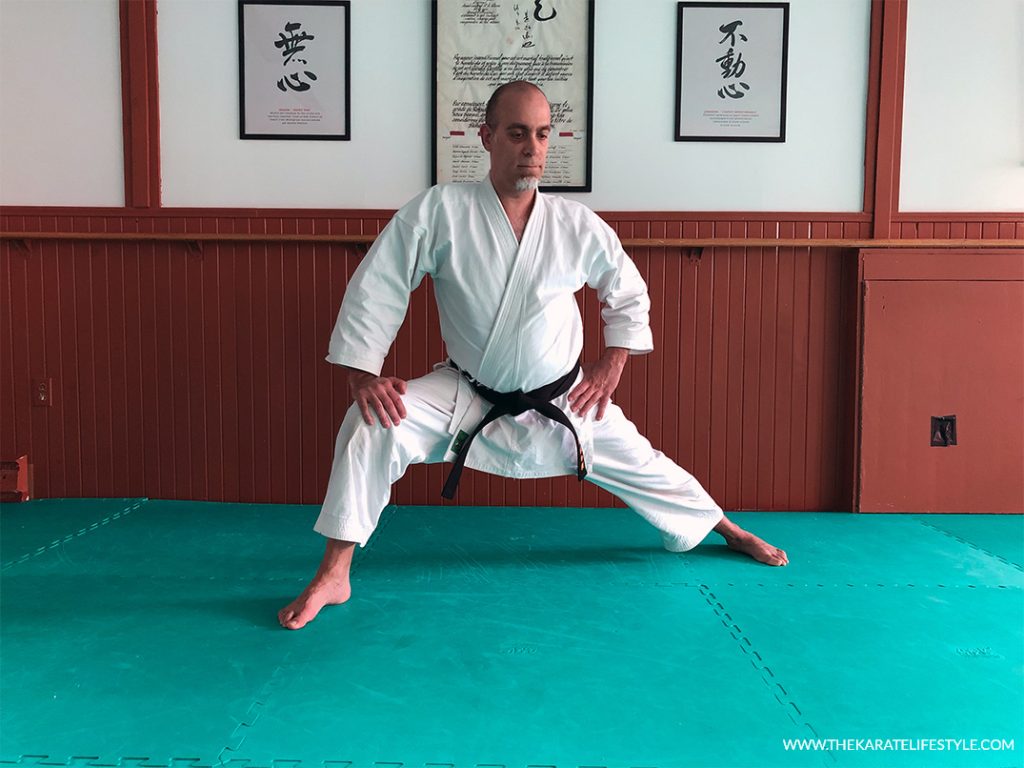
The side lunge is specifically designed to stretch your inner thighs. Your mawashi-geri will thank you for it later!
- Stand tall with your leg open about 4 feet apart, with your feet parallel and facing forward,
- Bend your left knee and drive your body weight towards the left,
- If you feel uncomfortable pressure in your bended knee, slightly “open” the angle your foot,
- Slightly rotate your pelvis to the left to increase the stretch of your right inner thigh,
- Hold the position for 15 to 30 seconds, and repeat a few times for each side.
c) Seated Adductor Stretch
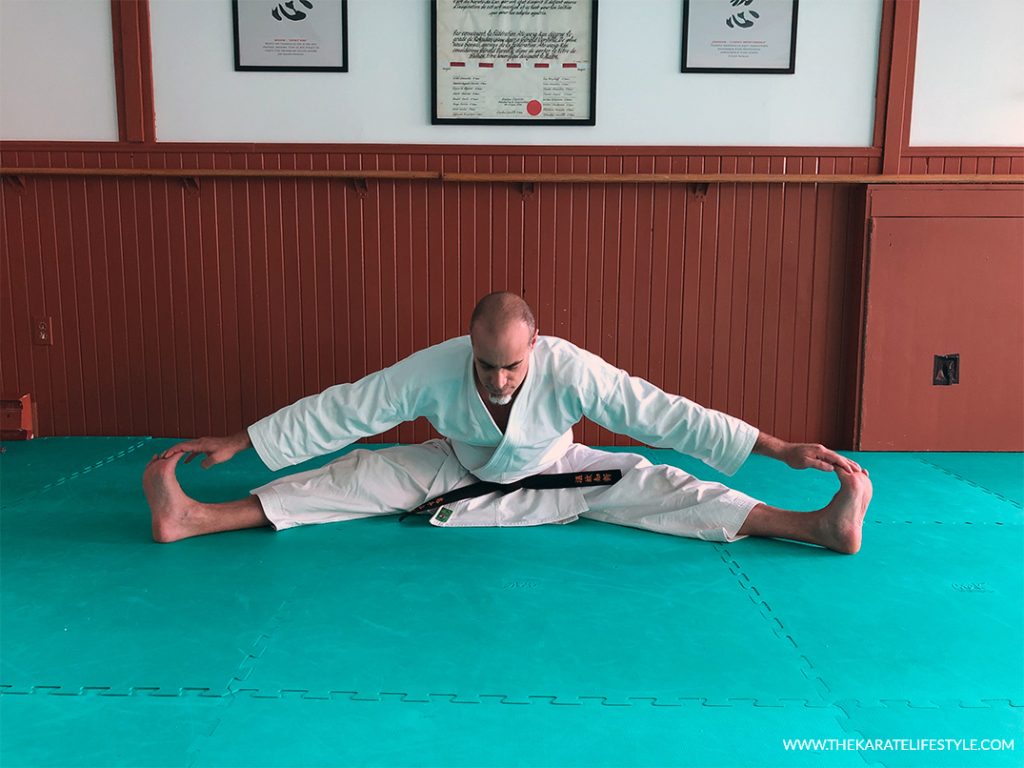
The seated adductor stretch is a classical Karate stretch. To get the most benefit out of it, don’t just go down and immediately come back (like it’s generally done in most Karate dojo), but keep the position for an extended period.
- Sit on the floor with your back straight and open your legs as much as you can without hurting yourself,
- Exhale and bend forward at your hips until you feel some resistance,
- Make sure to keep your back straight and chest up,
- Hold the position for 30 to 60 seconds, and repeat for a total of 3 repetitions on each side.
3. Hips
a) Happy Baby Stretch
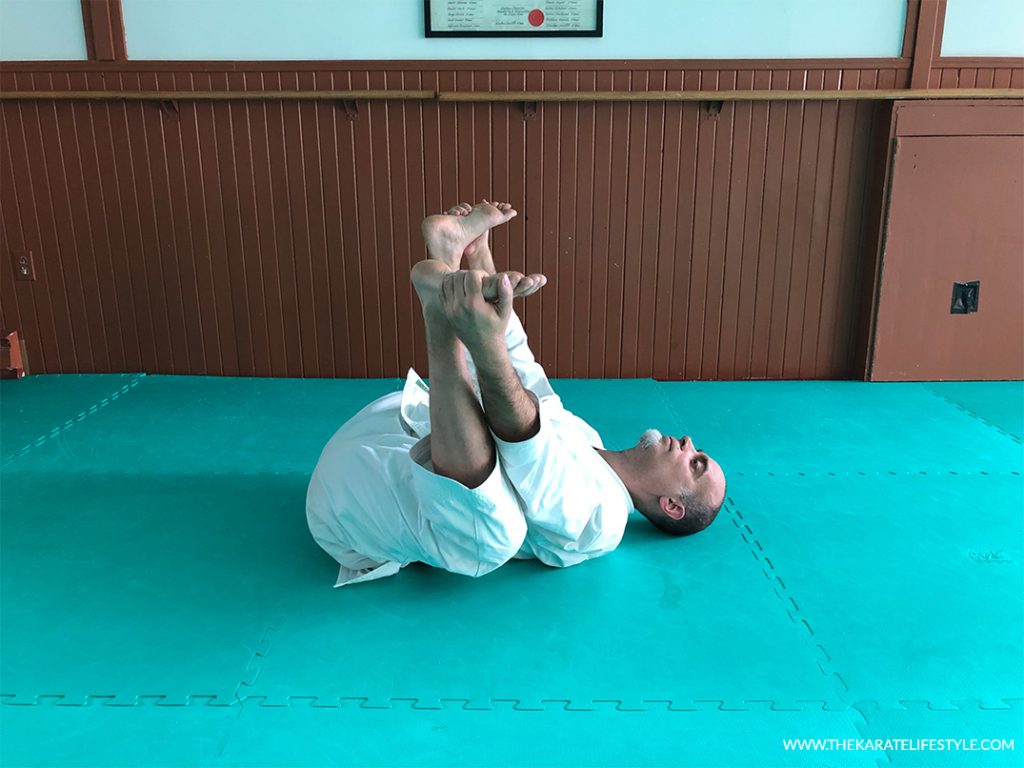
The happy baby exercise stretches the hip flexors and opens up the lower back for your round-kick.
- Begin by lying down on your back,
- Bend your knees and bring them up towards your upper body,
- Put your arms inside of your thighs and grab for the outside edges of your feet or ankles,
- Pull on your legs, bringing your knees closer to your body,
- Gently balance from side to side to massage the lower back,
- Keep the posture for 30-60 seconds and repeat 2 more times.
b) Hip Flexor Stretch
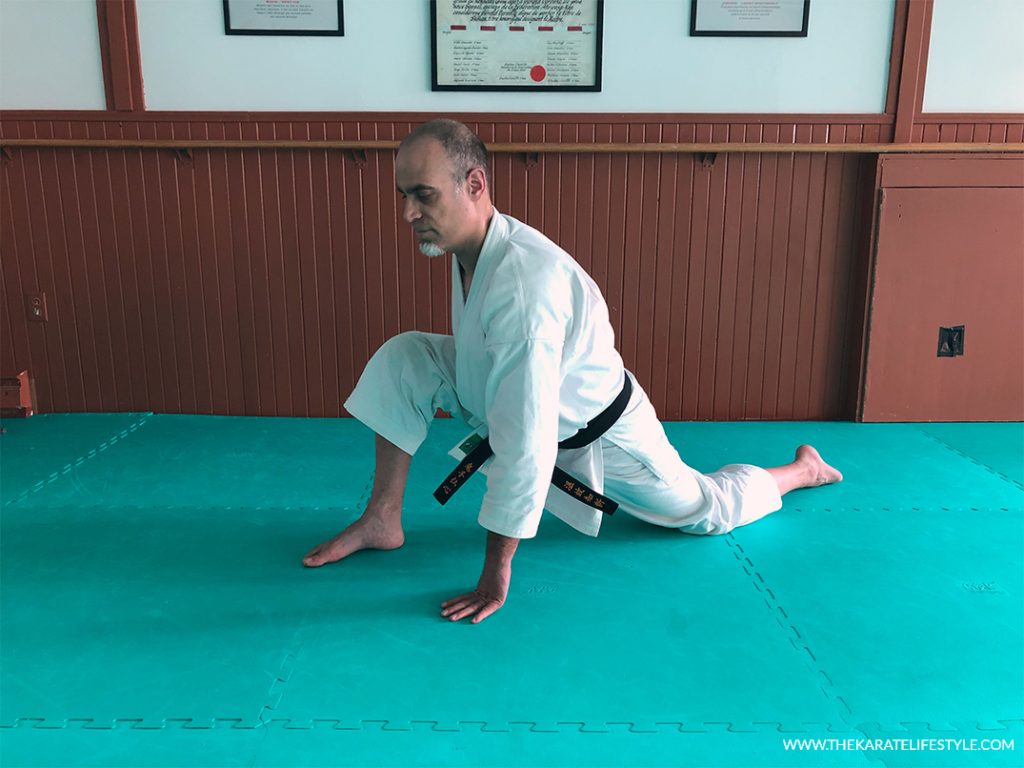
Many people do this exercise incorrectly and turn out stretching the lower back more than the hip flexors. To make sure you are really stretching the hip flexors, tilt your pelvis backward when you stretch.
- Kneel on one knee, and place the foot of your other leg flat on the floor in front of you (knee at a 90° angle),
- Keep your torso upright and put your hands on your hips or on your front knee,
- Gently bring your hips forward as far as you comfortably can,
- Hold the position for 30 to 60 seconds, and repeat for a total of 3 repetitions.
c) Lizard Pose
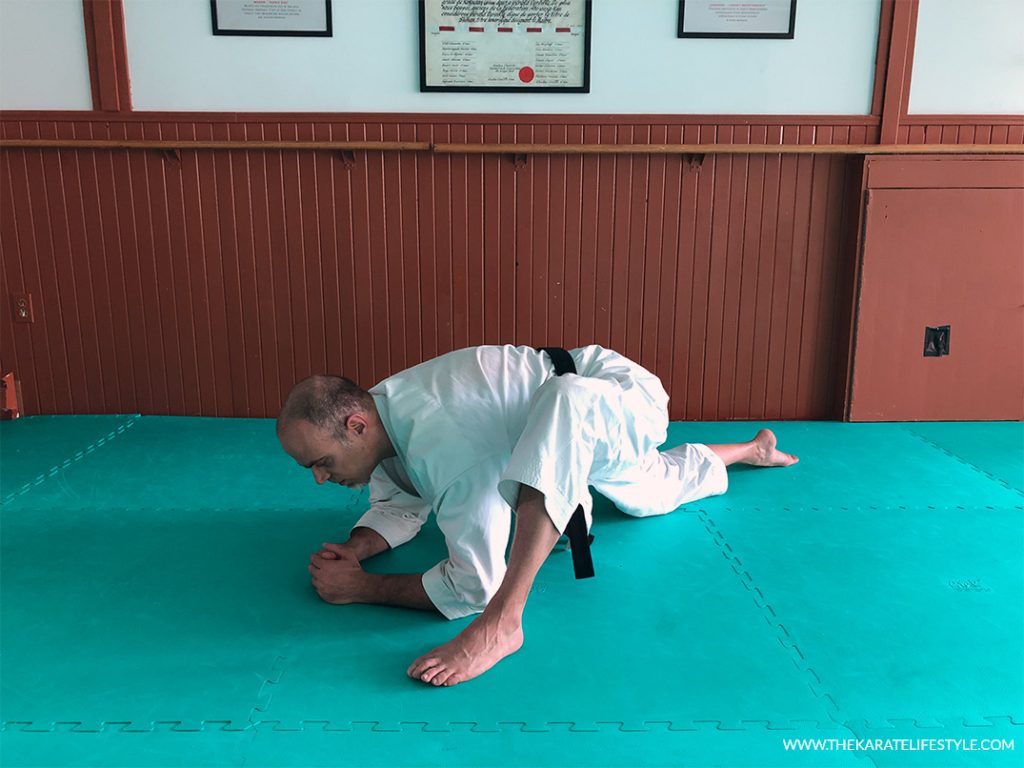
Lizard Pose comes from Yoga where ist called Utthan Pristhasana in Sanskrit. This is a great exercise that stretches the deeper hip openers, precisely what you need for delivering a high-level mawashi-geri.
- Start this stretch on all four on the floor,
- Bring your right foot forward, to the outside of your right hand,
- Keep your rear leg flat on the floor,
- Push forward your hips and stretch your spine,
- Hold the position for 30 to 60 seconds,
- Bring your leg in the original position, and repeat for a total of 3 repetitions on each side.
Strengthening for the Mawashi-Geri
Without any doubt, the power of your mawashi-geri or round kick comes from your hips and core. You might be flexible, but that doesn’t guarantee that you’ll be able to kick high with your round kick. You need to strengthen your body so that you can generate the necessary pull and momentum to lift your leg high up.
Targeted regions
Hips, Core (laterals).
1. Hips
a) Lateral Leg Lift
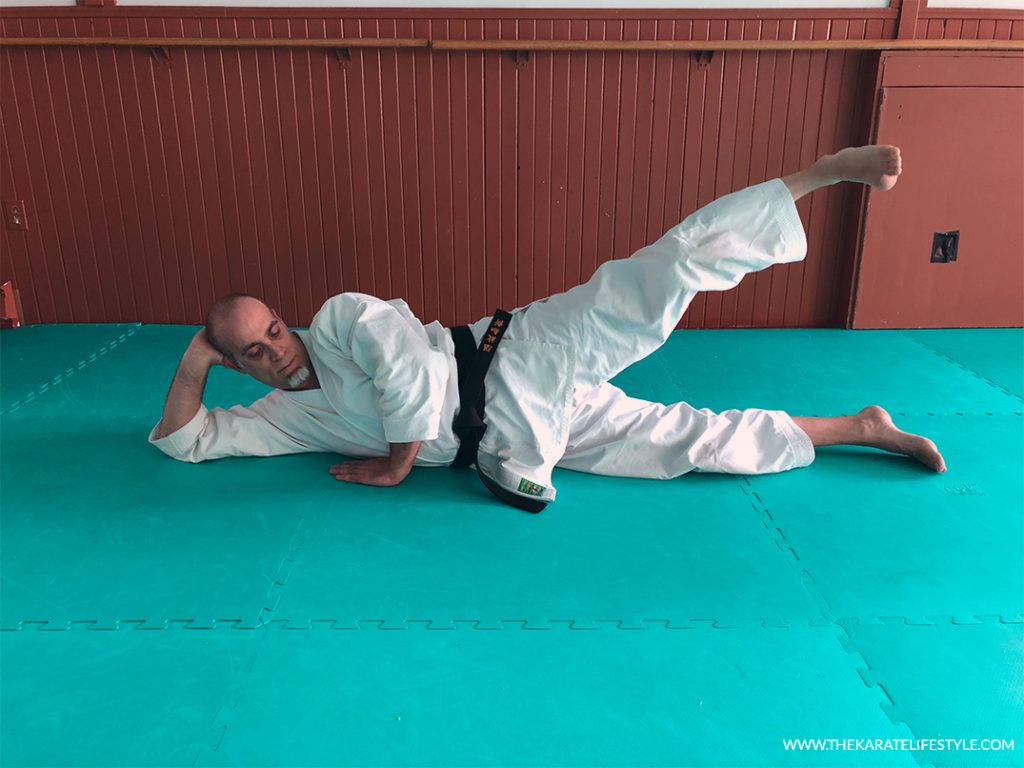
Lateral leg Lifts really help strengthen the outer hip muscles, especially by the gluteus medius. Strengthening the gluteus medius also brings the added benefit of enhancing your back health.
- Lie down on the floor on your side,
- Align your body in a straight line from head to toe,
- Support your head with your hand,
- Keep your top leg straight as you raise it toward the ceiling,
- Do 3 sets of 10-15 repetitions, then switch sides.
b) Lying Hip Raise
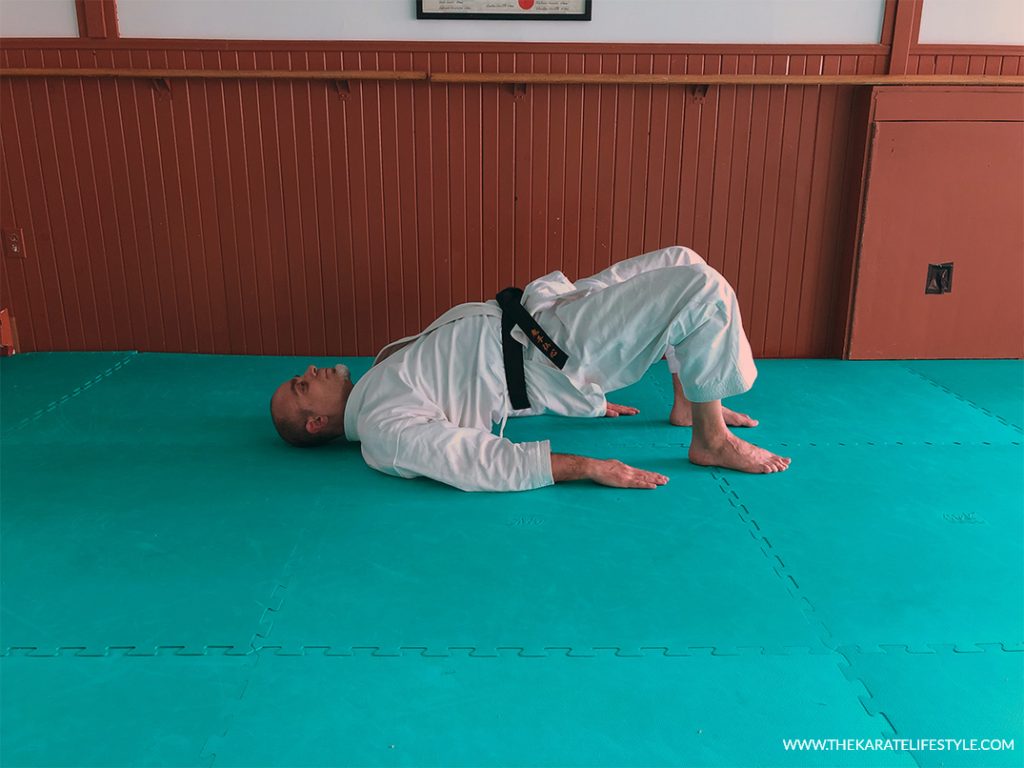
The lying hip raise is a versatile exercise that helps strengthen your hip flexors (and glutes), one of the muscle groups requires in the execution of the round kick.
- Lie on the floor on your back with your knees bent and both feet flat on the floor,
- Keep your arms out to the side with your palms on the floor,
- Tighten your core, squeeze your glutes, and raise your hips off the floor until your body forms a straight line from shoulders to knees,
- Do 3 sets of 10-15 repetitions.
c) Toe-Touch and Extend

The “toe-touch and extend” is an exercise that I developed for strengthening my muscles for the mawashi-geri. It’s a very simple movement, but because it mimics the movement of the round kick, it’s really effective.
- Lie on the floor, on your side,
- Support your head with one hand and keep your other hand on the floor to keep your balance,
- Keep the leg closer to the floor in a straight line,
- Bend your other leg and touch the floor behind you with the tips of your toes (avoid moving your body, use your hips),
- Extend your leg as if you were giving a high round kick,
- At the end of the extension, keep the angle and slightly lift your leg toward the ceiling,
- Repeat 10 times each side.
2. Core
a) Crescent Moon (Pilates Ball)
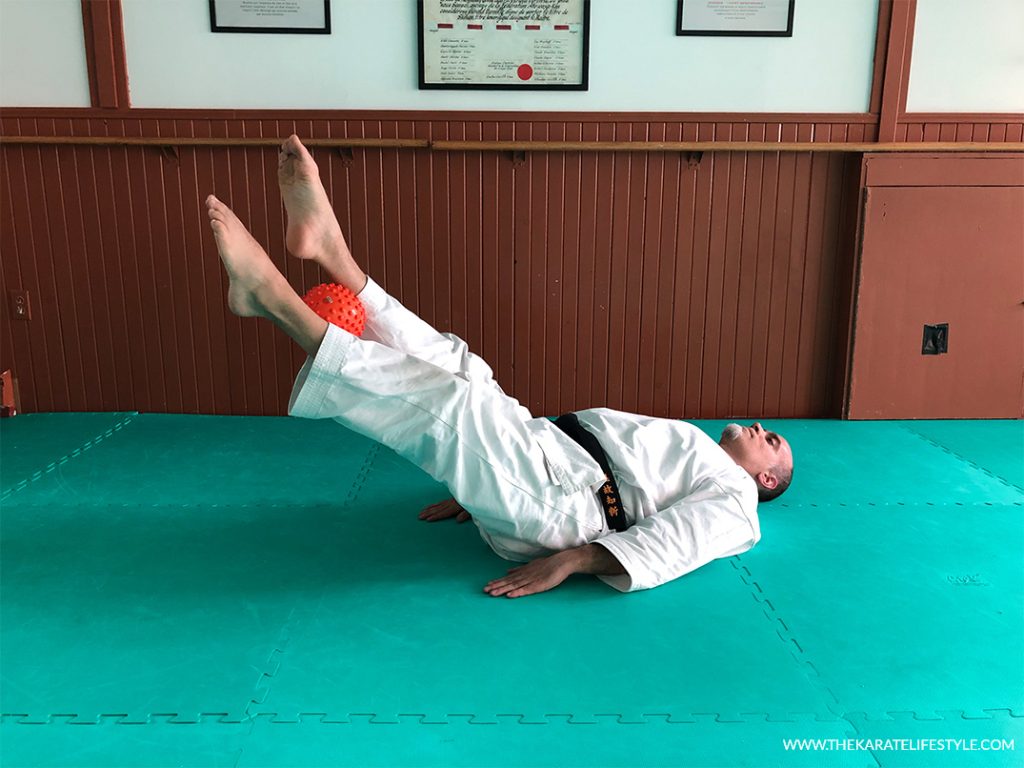
The Crescent Moon is originally a Pilates exercise, but it was quickly adopted by martial artists. It’s one of the best, if not the best exercise that activates the deep muscles necessary for the round kick. It requires a Pilates Ball .
- While lying down on your back, place the Pilates ball between your legs, near your ankles,
- Point your toes and lift your feet toward the ceiling about 2 or 3 feet above the ground (depending on your size),
- Keep your hands by your side to hold your balance,
- Roll the legs on the ball so that one leg gets on top and the other below, and alternate the legs,
- Do the crossing motion 10 times each side.
b) Leg Circle
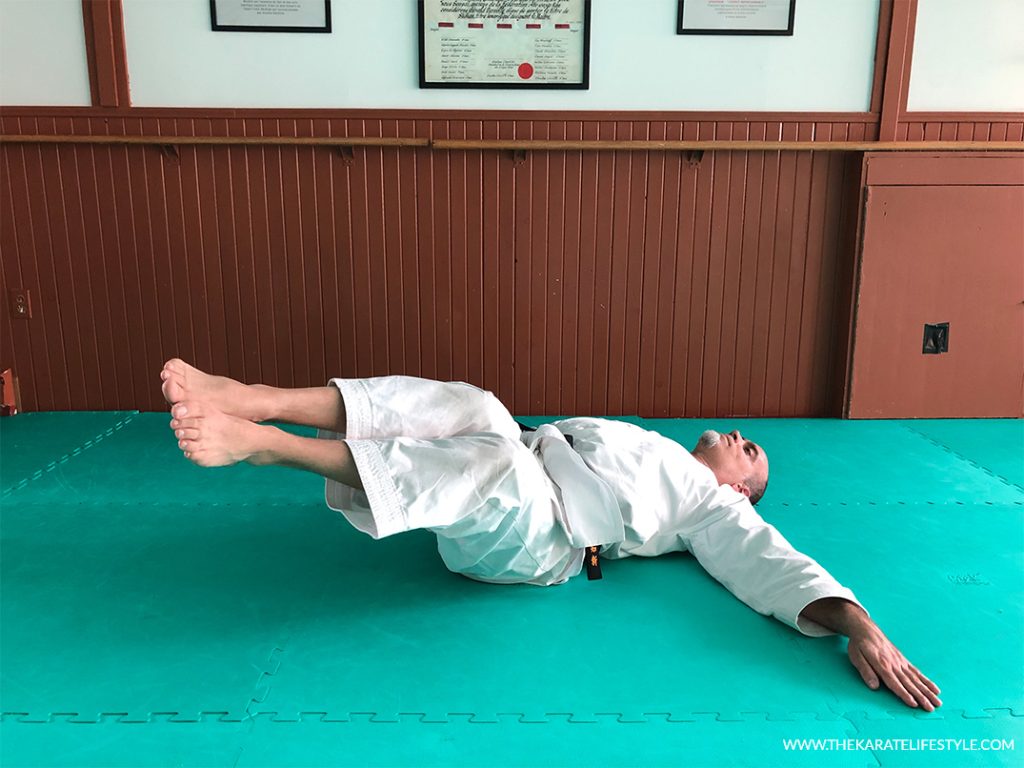
The Leg Circle is another excellent strengthening exercise that will literally take your mawashi-geri to a whole new level! Do this exercise in a circular, flowing motion.
- Lie on the floor and rest arms out to the sides for balance at a 90° angle with your body,
- Hold your legs extended about 1 foot off the floor,
- Rotate your lower body on one side and bring your knees in towards your chest,
- Go back to the starting position with your legs off the floor,
- Rotate to the other side and bring your knees towards your chest,
- Perform 3 series of 10-15 reps on each side.
c) Side Crunch
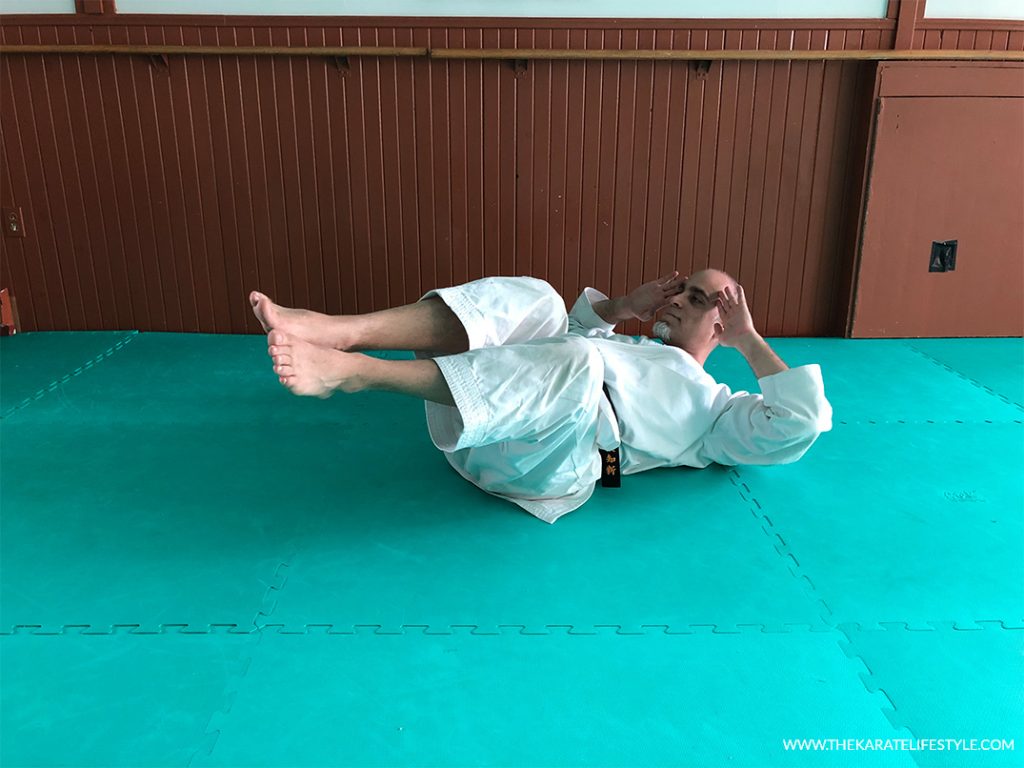
The side crunch is a classic exercise for a reason, IT WORKS! Like many core exercise done in a twisting motion, the side crunch targets muscles used when delivering the round kick.
- Lie on the floor on your back with your knees bent and your feet flat on the floor,
- Place your hands behind your neck or head (without pulling) and tighten your core,
- With your feet together, drop both knees over to your side so that you are resting in a twisted position,
- From this position, lift your shoulders off the ground,
- Pause at the top of the motion for a second or two, and slowly go back down,
- Perform 3 series of 15-20 reps on each side.
How to kick higher with the Yoko-geri?
Together with the mae-geri and the mawashi-geri, the yoko-geri is one of the fundamental Karate kicks, but also one of the hardest to execute correctly.
From a technical standpoint, it’s a difficult kick to perform, it has lots of parameters to meet to be done right. Unfortunately, like every other kick, knowing the right technique isn’t enough, you need the necessary strength and flexibility of some specific muscle groups. Here are the best flexibility and strength exercises to improve the height of your sidekicks.
Stretches for the Yoko-Geri
If you are not flexible, the yoko-geri can be quite challenging to pull off. By now, it’s pretty clear that you absolutely need to have flexible hamstrings for kicking, but the sidekick also requires flexible hips and lower back, two regions many people often have issues with in terms of stiffness.
Targeted regions
Hamstrings (supporting leg), Hips (inside), Lower-back,
1. Hamstring Stretches
a) The Standing Forward Bend (wide legged)
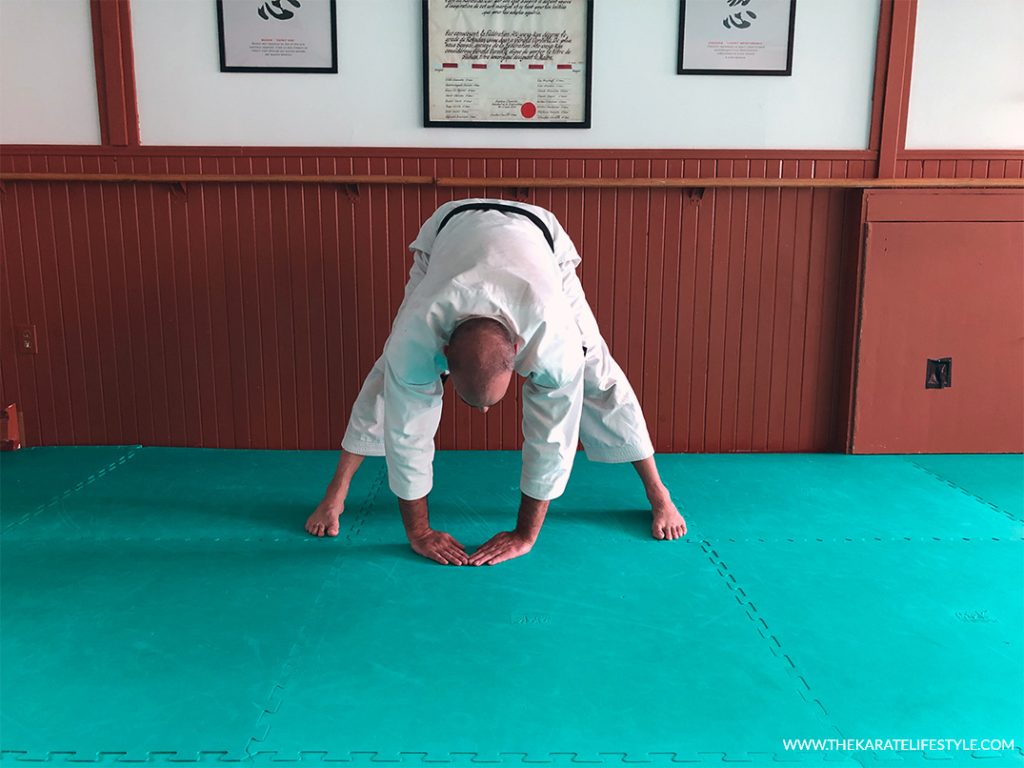
The forward bend is another classical Karate stretch that made it through the years. This exercise will prepare you to deliver high sidekick as it works on your hamstrings (supporting leg), but also your lower back, calves.
- Begin by opening your legs on the side to about 2 times shoulder width,
- Bend forward by moving your lower back first,
- Put your hands on the floor in front of you at shoulder width,
- Keep your back straight,
- Keep your upper body close to the floor,
- Hold the position for 30 to 60 seconds, and repeat for a total of 3 times.
b) Standing Grab and Hold Stretch
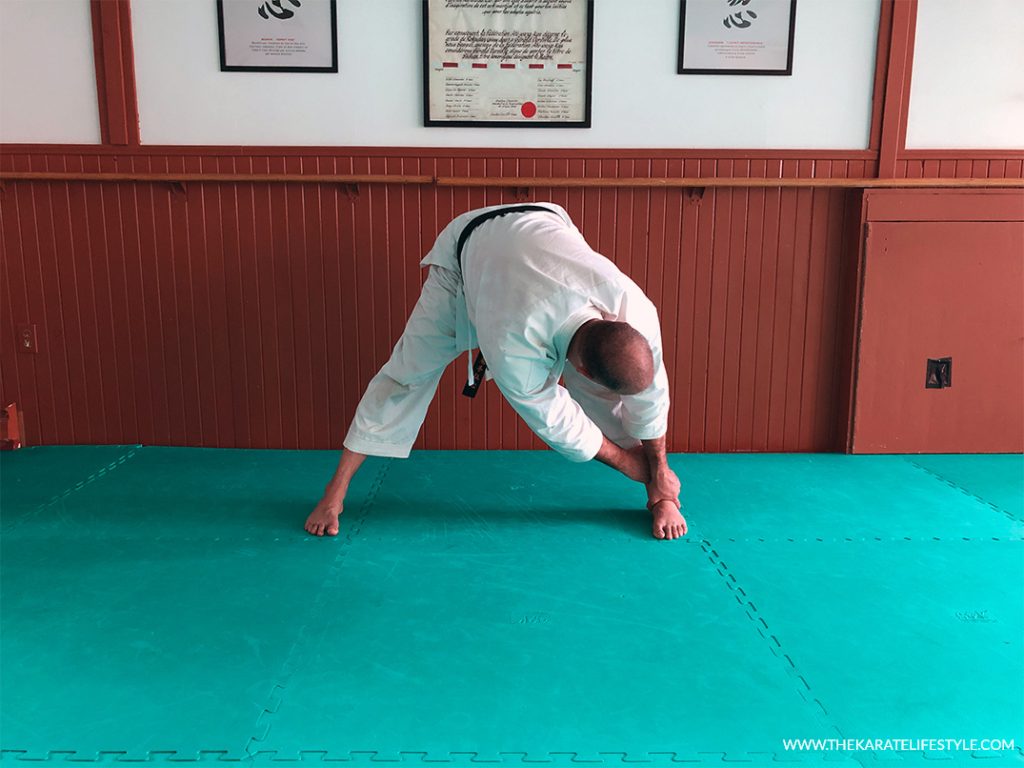
The standing grab and hold stretch is a variation of the Standing Forward Bend, and it’s a great way to stretch your hamstrings, lower back, and calves.
- Begin by opening your legs on the side to about 2 times shoulder width,
- Bend forward by moving your lower back first,
- Grab one of your ankles with two hands,
- Keep your back straight,
- Try to bring your head to your knee,
- Hold the position for 15 to 30 seconds, and repeat for a total of 3 times.
c) Floored Double Forward Bend
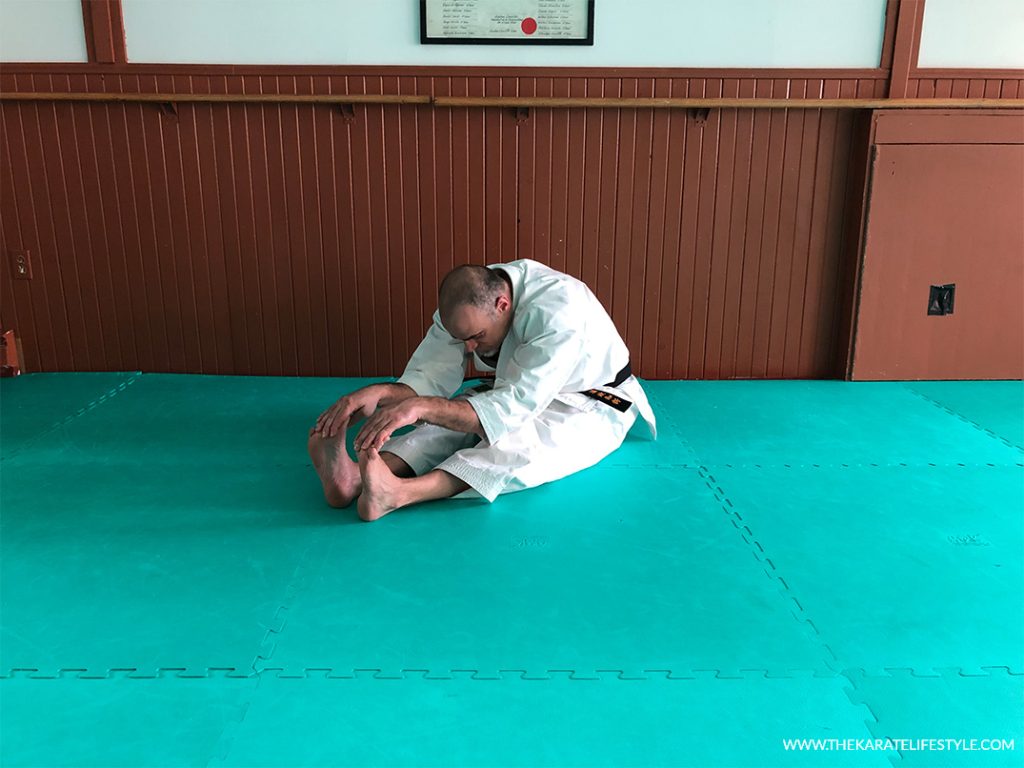
This exercise is excellent for stretching two important muscles or regions that can put a break to your effort of kicking higher: your hamstrings and your lower back.
- Sit on the floor with your back straight and extend your legs in front of you,
- Have legs flat on the floor at all times,
- Bend forward with your lower back first and grab your toes,
- Hold the position for 30 to 60 seconds, and repeat for a total of 3 times.
2. Hips stretches
a) Standing Pendulum
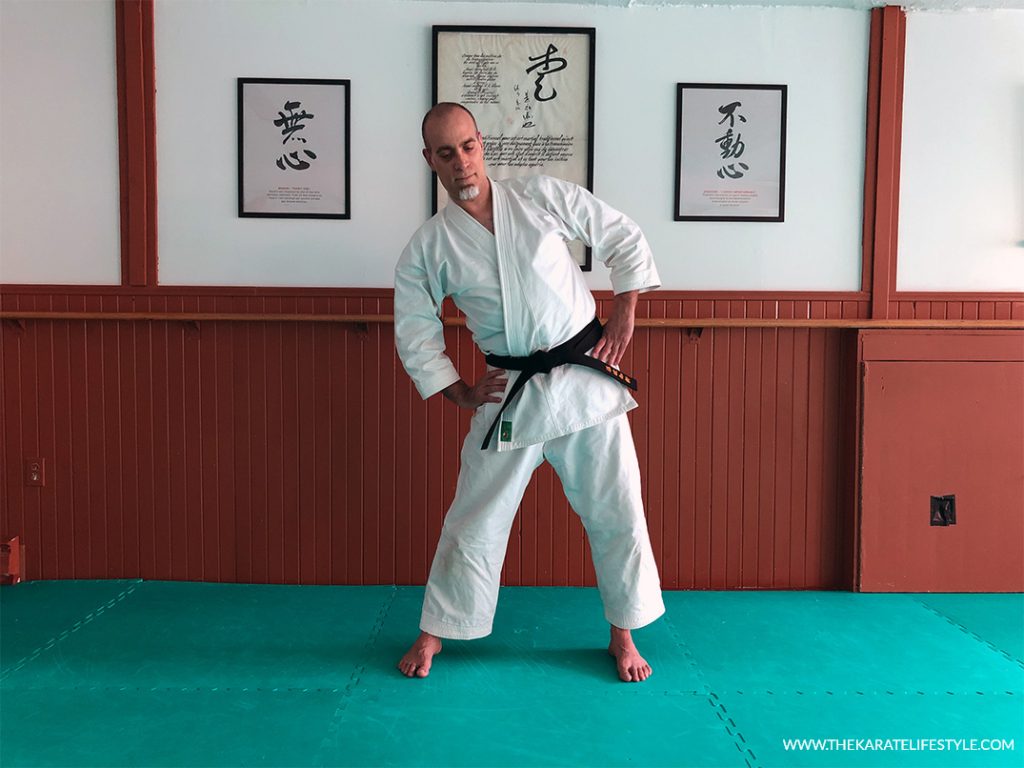
The standing Pendulum is a basic stretch but gets the job done right. It will help you stretch your hips gently and softly.
- Stand tall and put your feet about shoulder width,
- Put your hands on your hips,
- Slowly balance on one side of your body,
- Keep your back tall and erected,
- When you start feeling the hip muscles stretching, keep the pause for 15 to 30 seconds,
- Repeat for a total of 3 times on each side.
b) Outer Hip Stretch
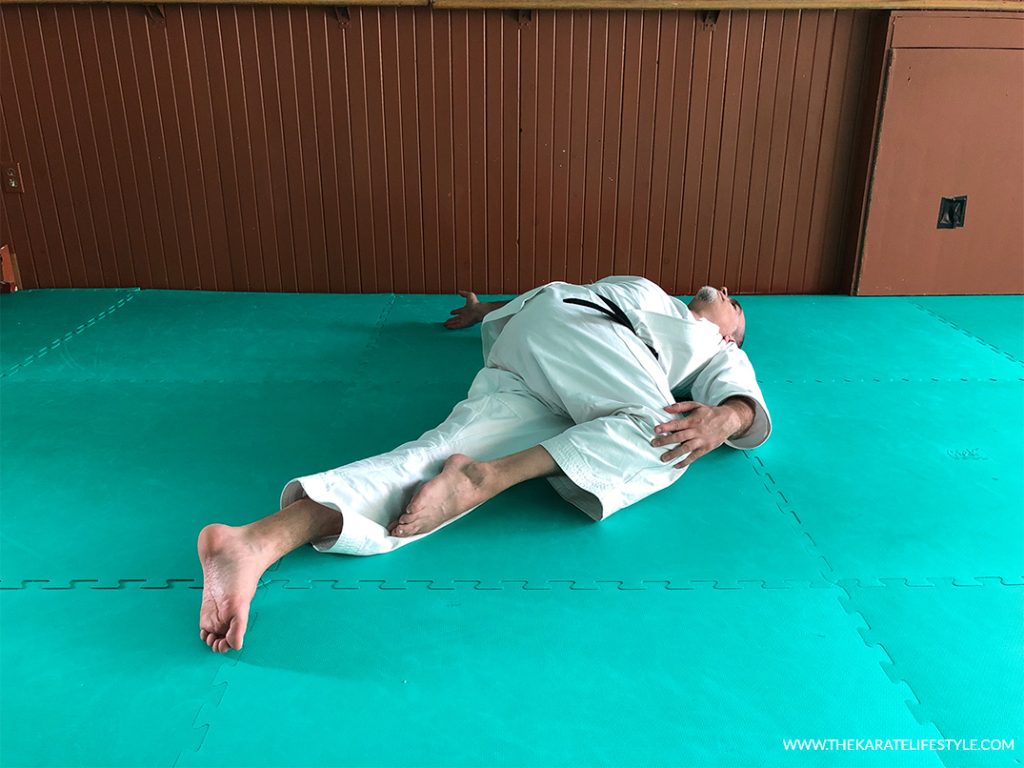
Personally, this stretch makes my hips and lower back feel like new. I do it every morning in bed before rising up. It’s, of course, a great way to stretch your hips/lower back for kicking higher.
- Lie down on your back,
- Cross the left foot over the right knee, keeping the left knee bent,
- Use your right hand to pull the light knee across your body,
- Extend your light hand to the side at a 90°angle with your body,
- Hold the position for 30 to 60 seconds, and repeat for a total of 3 times on each side.
c) Twisting Lunge Hip Stretch
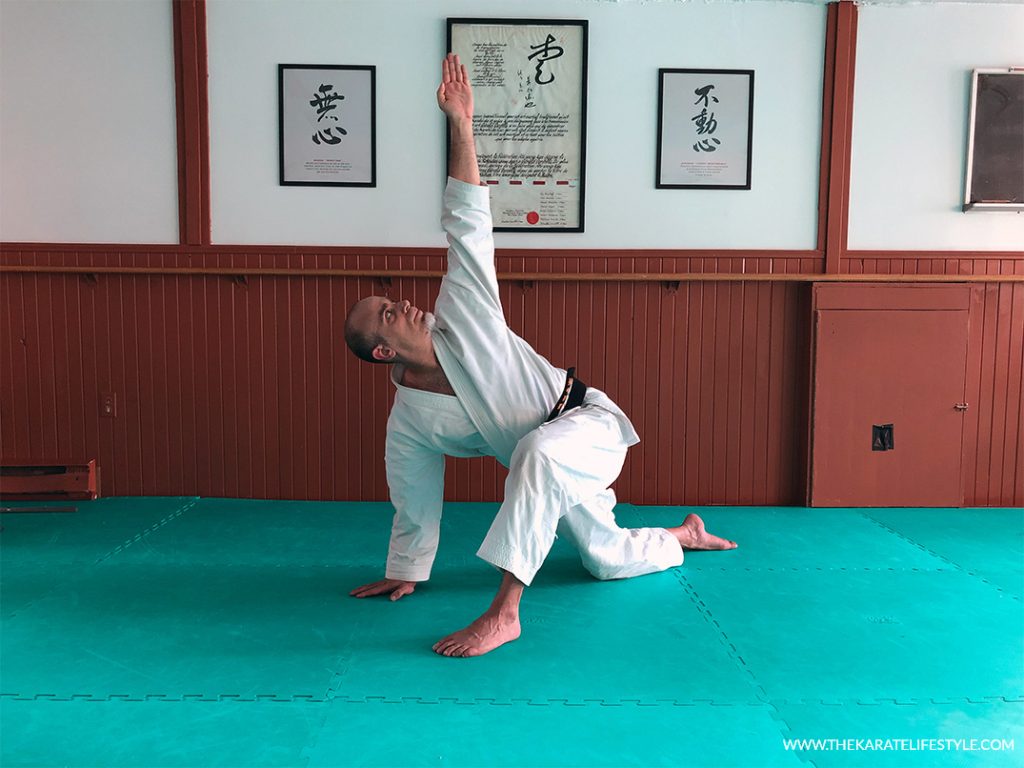
Like every other stretch proposed here, this stretch is excellent for giving flexibility to the muscles used when delivering the yoko-geri.
- Begin in a deep lunge with your right foot forward,
- Put your left hand on the floor, in line with your left shoulder,
- Place your left knee on the floor,
- Extend your right arm vertically and twist your torso,
- If it doesn’t stretch enough, straightening your left knee to bring it off the floor,
- Hold the position for 15 to 30 seconds, and repeat for a total of 3 times on each side.
3. Lower Back Stretches
a) Cat Stretch
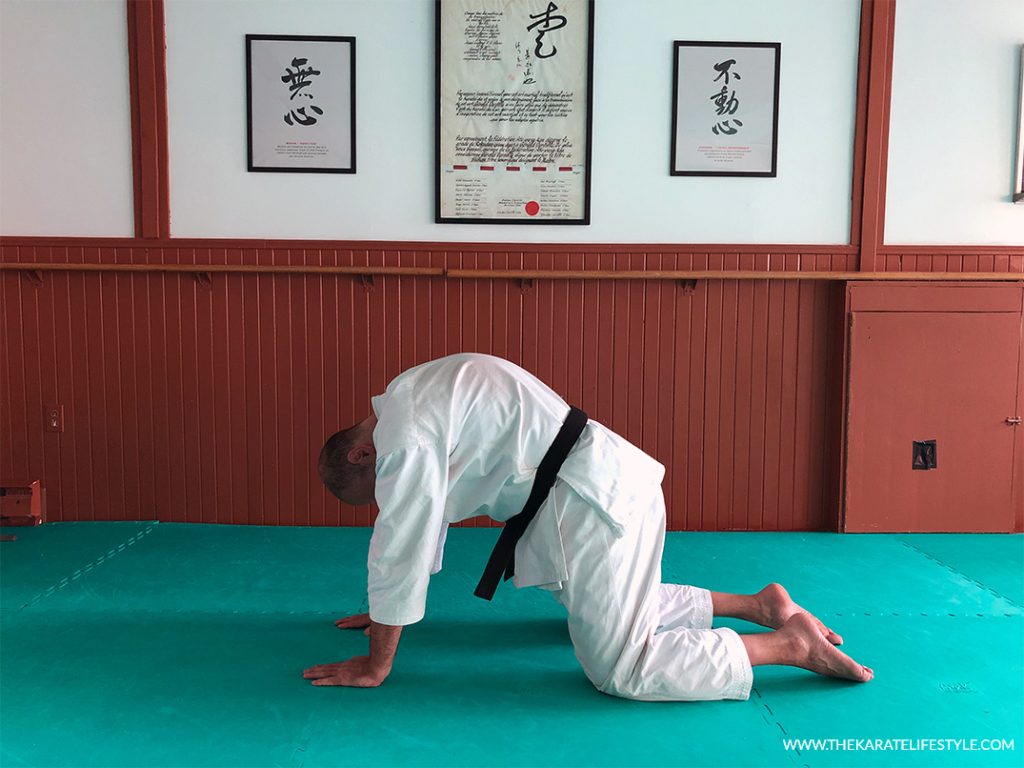
The Cat Stretch is a fundamental yoga posture that mimics the movement of a cat. Your spine will move from a rounded position (flexion) to an arched one (extension).
- Like a cat, go on the floor on your hands and knees,
- Keep your arms and tights perpendicular to the floor (hands directly under the shoulders, knees hip-width apart),
- Look straight in front of you,
- Breathe in and lift your chin and tilt your head back, push your navel downwards and lift your tailbone,
- Hold the pose for 10-15 seconds,
- Now exhale, and drop your chin to your chest and arch your back the more you can,
- Hold this pose for 10-15 seconds and return to your initial starting position,
- Repeat for a total of 3 times.
b) Cobra Stretch
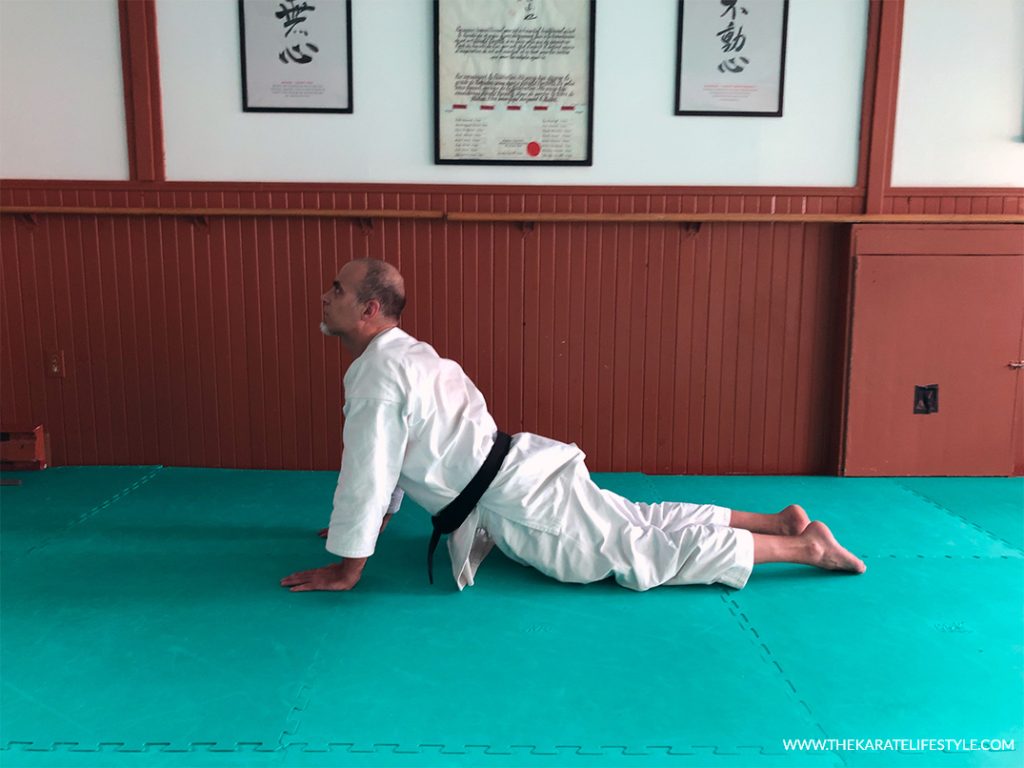
The cobra stretch also comes from Yogic practices, and it’s designed to stretch and decrease the stiffness of your lower back muscles, allowing you to deliver your kick higher.
- Lie down on the floor, on your belly,
- Bend and rest your upper body on your elbows,
- Align your shoulders and elbows in a vertical line,
- Extend your arms so that your upper body will be lifted off the floor,
- Keep your head and neck straight,
- Hold the position for 15 to 30 seconds, and repeat for a total of 3 times.
c) Twisted Seated Back Stretch
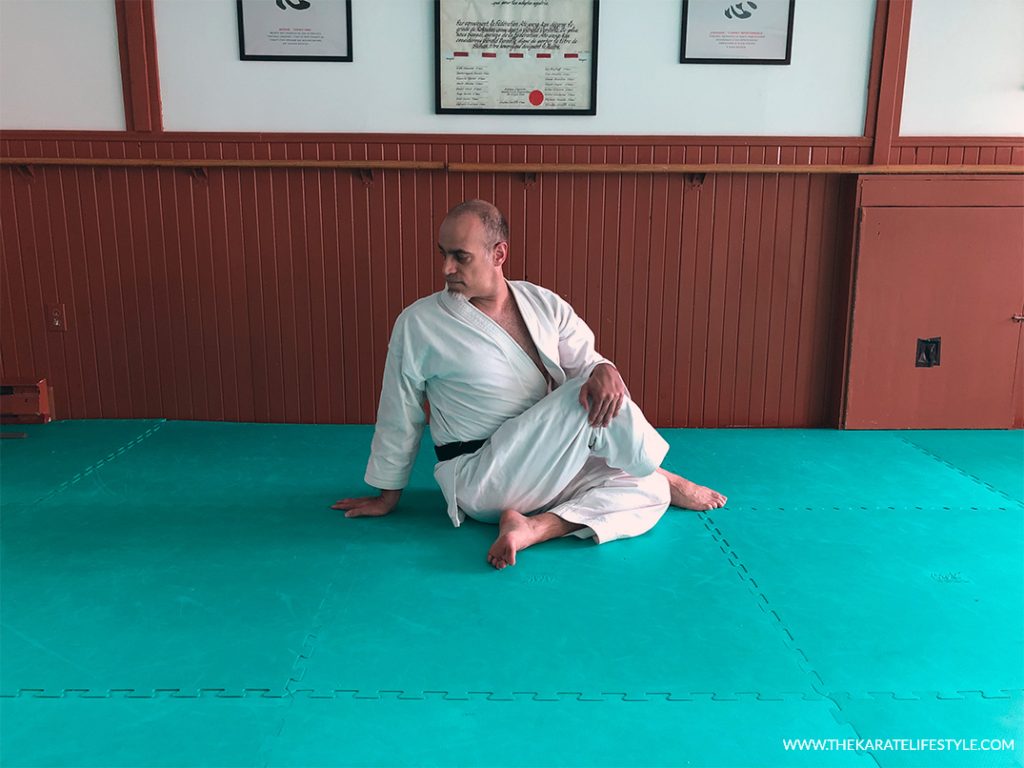
Another of my favorite! This exercise really stretches the lower back and, by the nature of its twisting motion, conditions your body for delivering your yoko-geri higher.
Note: Almost every person that I trained who had trouble with delivering the sidekick at high level happened to have a tough time with this stretch – their lower back was too stiff.
- Sit on the floor with your back straight,
- Cross your right leg over your left leg placing your foot next to your thigh,
- Push your left leg in towards your center,
- Place your left hand outside of your right knee,
- Gradually and gently start to twist your body to the left, pull with your left hand,
- Hold the position for 30 to 60 seconds, and repeat for a total of 3 times on each side.
Strengthening for the Yoko-Geri
Delivering high yoko-geri is hard work because this kick requires a not so common combination of muscle synchronicity (muscles working together). If you want to deliver your yoko-geri higher, you absolutely need to get your glutes, hips, and core stronger. Here are three exercises specifically designed to do that.
Targeted regions
Glutes, Hips, Core.
1. Glutes
a) Donkey Kick
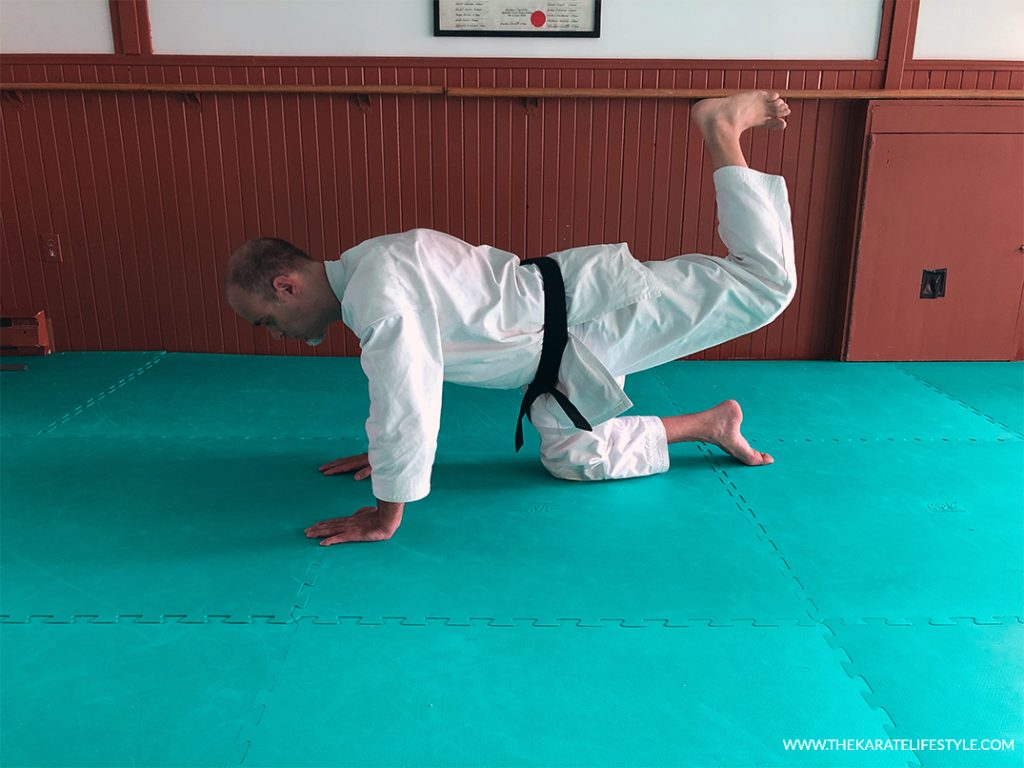
This move will not only work hard on your glutes, but it will also work on your entire core. The donkey kick movement is relatively close to the sidekick’s motion.
- Go to the floor on your hands and knees (knees under your hips and your hands under your shoulders),
- Extend your feet,
- Keep the knee bent at 90° and kick one leg back toward the ceiling,
- Make sure your low back doesn’t arch and that you are raising your leg with your glute,
- The foot should push straight up to the ceiling, with your heel out (make sure not to bend your elbows in order to get your leg go higher),
- Hold for 2-5 seconds at the height of the movement by using the glute.
b) Knee Raise Twist
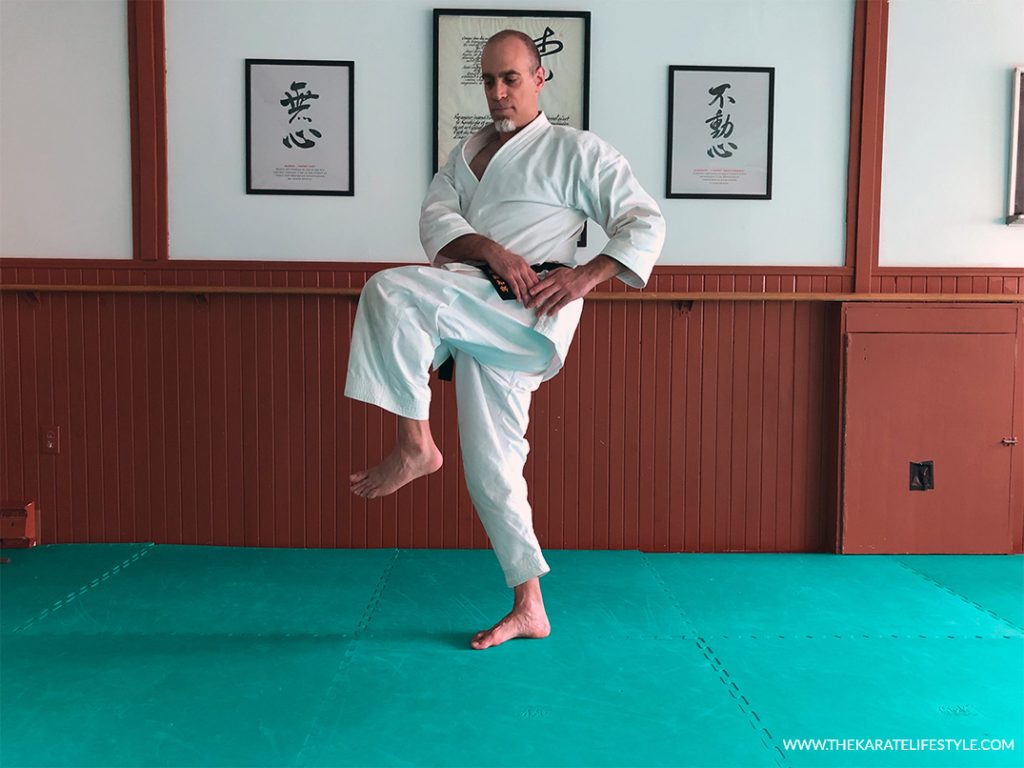
This exercise almost seems design for the sidekick as it mimics its fundamental motion (pulling the knee in). This is a significant strengthening (and balance) exercise.
- Stand tall and put your feet shoulder-width apart,
- Put your hands together in front of you at belt level,
- Move your right leg behind you, keep it extended and touch the floor with the tip of your toes,
- At the same time, move your hands to your far left, always at belly height,
- Tighten up your core and put all your body weight on your left leg (have no weight on your right leg, it just holds your balance),
- Drive your right knee up and into your hands as you twist your upper body to the right (it’s like the sidekick’s “chambering” motion),
- Do this exercise 10-15 times for a total of 3 series on each side.
c) Standing Kick Back (resistance band required)
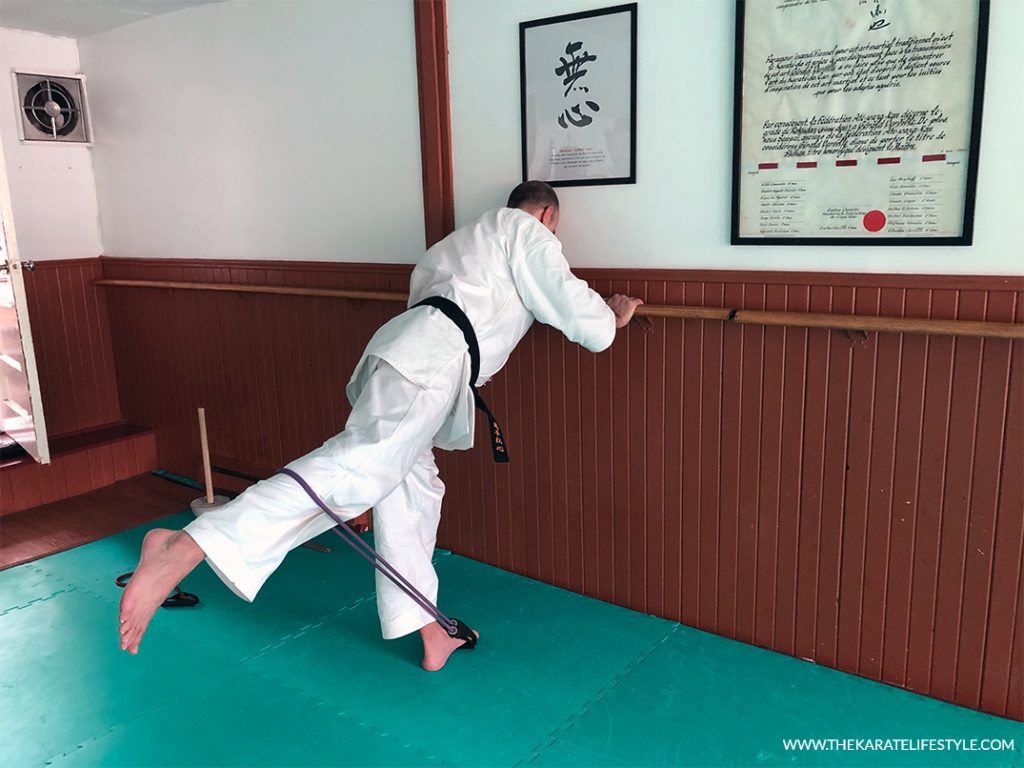
You will develop crazy powerful yoko-geri with this exercise, trust me! Kicking higher won’t be a problem after you work this move for a certain time. Working with resistance band drastically augment the effort of your workout, resulting in quicker improvements
- Loop the resistance band around your ankles,
- Stand tall with your feet about shoulder-width apart, with your knees slightly bent,
- Put your hands on a chair or on a wall for balance,
- Slowly lift and extend your leg backward (don’t hyperextend, you can hurt your knee),
- At the height of the movement, give a small extra push,
- Return to the starting position,
- Repeat 10-15 times for a total of 3 series on each side.
2. Hips
a) Fire Hydrant
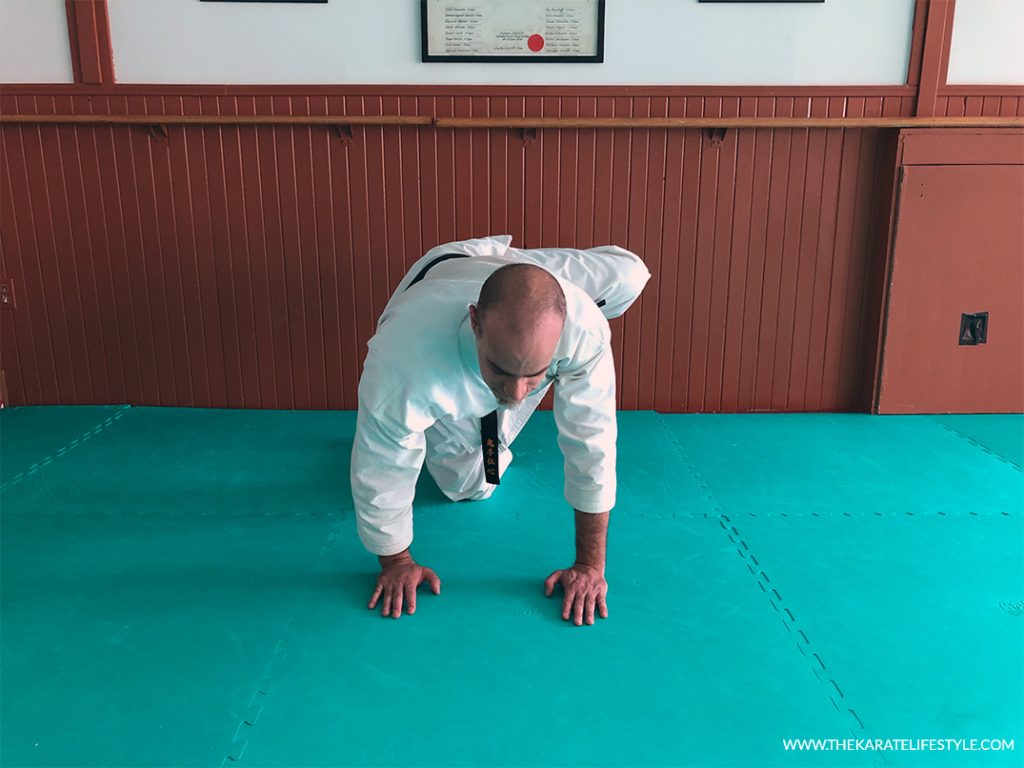
The fire hydrant stretch is another great strength exercise for improving your sidekick. Make sure you’re opening your hip throughout the move rather than rotating your torso to elevate your knee. If you wanna make it harder, loop in a resistance band and have fun!
- Start on all fours with your hands aligned with your shoulders and your knees with your hips,
- Maintain your knee at a 90° angle, and raise your right knee out to the side as high as you can (keep your core engaged),
- Hold the position for 2-5 second and lower your right leg to return to the starting position,
- Repeat 10-15 times for a total of 3 series on each side.
b) Lateral Band Walks (resistance band required)
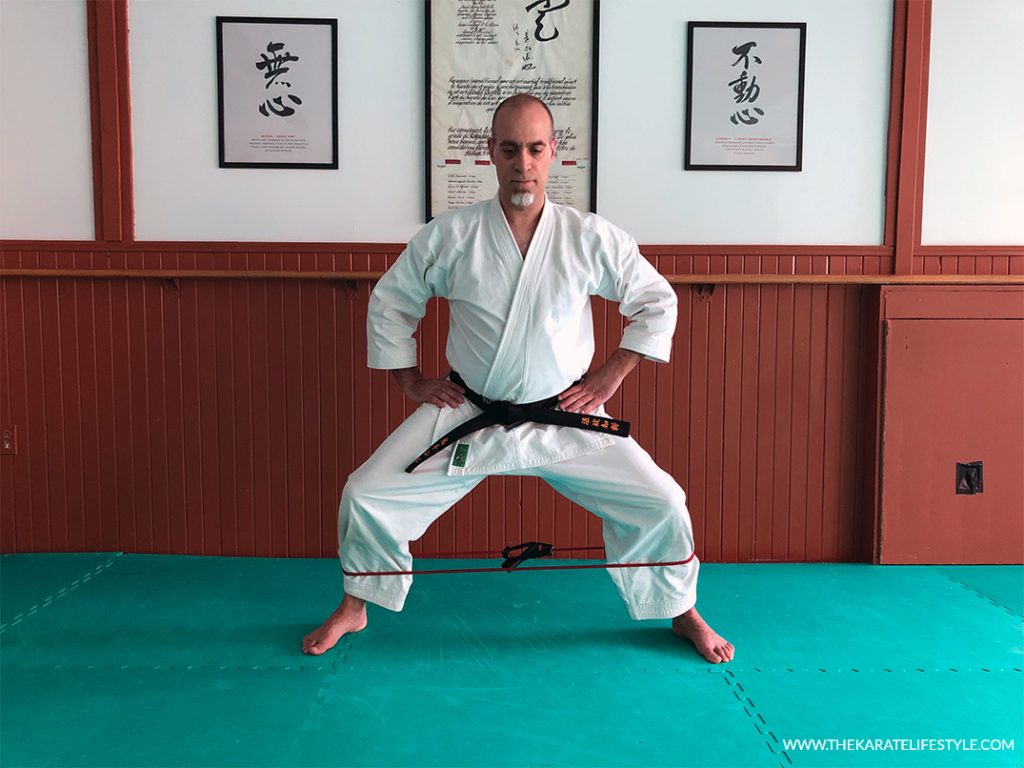
The lateral band walk is a fantastic hip exercise for strengthening your hips (and tights). It somewhat looks similar to a kiba-dachi in motion.
- Place the resistance band around your ankles,
- Stand in half squat position with your feet about hip-width apart,
- Put your hands on your hips,
- Take a step to the left with your left foot, so that your feet are a bit more than shoulder-width apart,
- Then, follow with your right so that your feet are hip-width apart again,
- Move three like this to the left, and then three back to the left to your original position),
- Repeat one full sequence, 3-5 times on each side.
c) Floored Hip Thrust
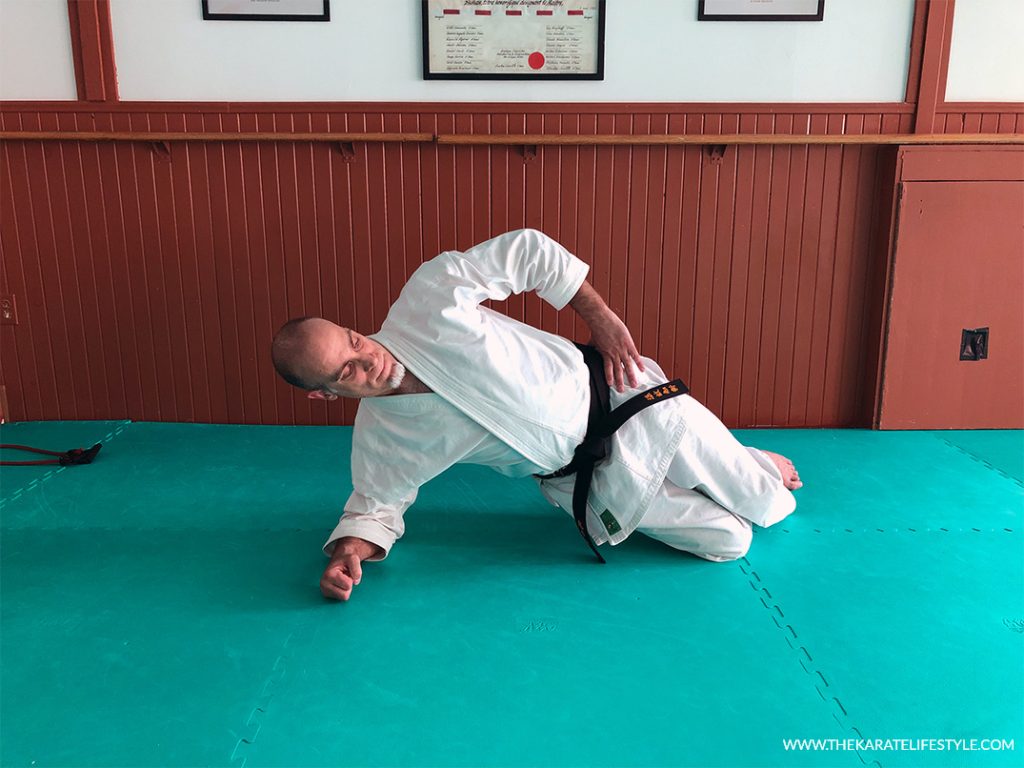
Although it looks simple and easy to do, the floored hip thrust is quite demanding on your core and hips.
- Lie on the floor on your side,
- Put your forearm horizontally on the floor,
- Bend your knees and bring them together,
- Slowly lift your pelvis off the ground by pushing on your knees (support),
- Repeat 8-10 times for a total of 3 series on each side.
3. Core
a) Side Plank
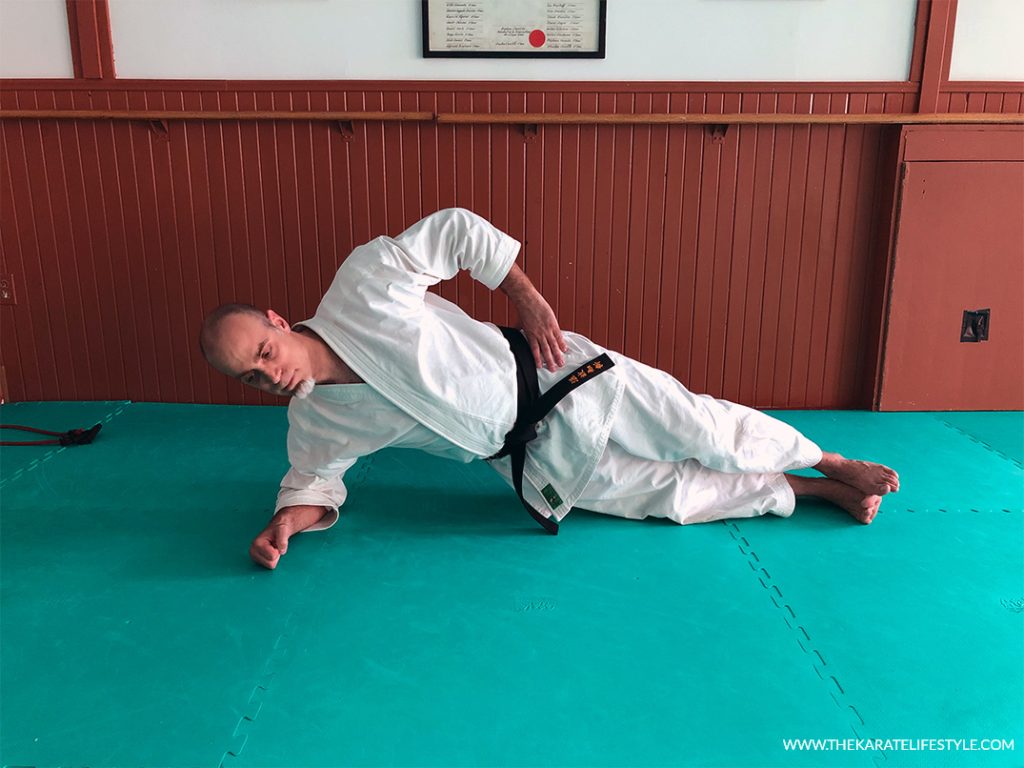
The side plank is the hardcore version of the Floored Hip Thrust. It’s an excellent exercise for strengthening the oblique abdominal muscles, which are required to deliver your sidekick higher.
- Lie on your right side, and put your right forearm horizontally on the floor,
- Contract your abdominal muscles, pulling your abdomen toward your spine,
- Lift your hips and knees off the floor, keep a straight line with your head,
- Hold the position for 30-60 seconds then return to your starting position,
- Repeat 3-5 times on each side.
b) Bird-Dog Exercise
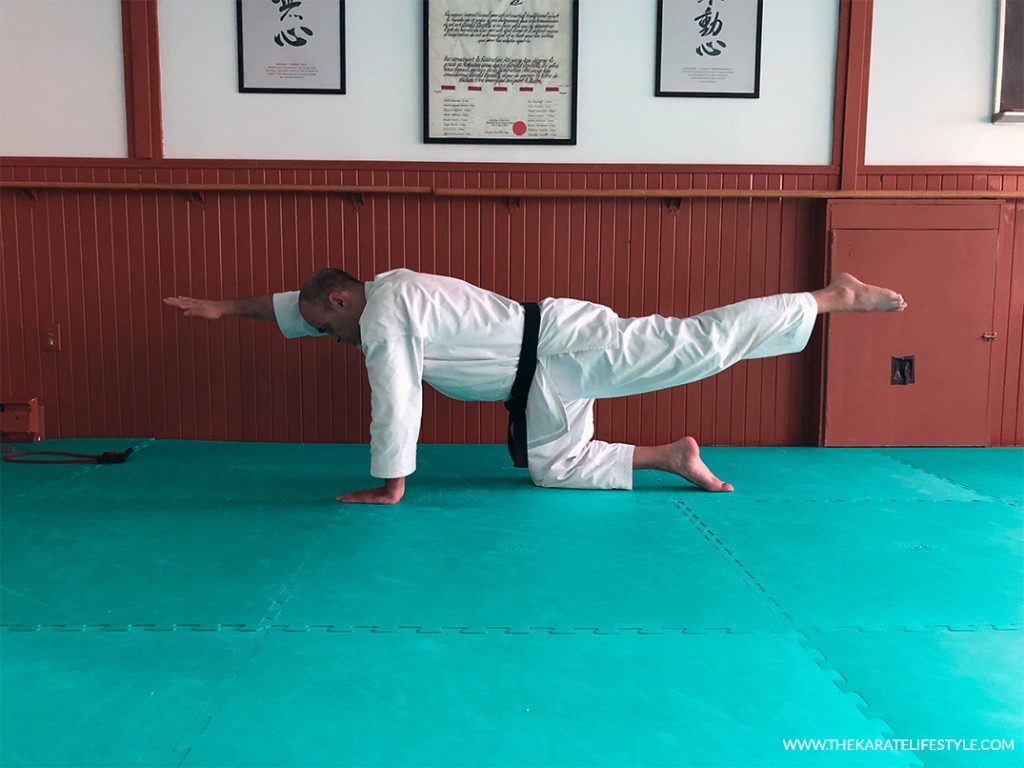
The bird-dog is an exercise that will strengthen your core, —more precisely, the abdominal muscles, lower back, glutes, and thighs. After months of this workout, forget about Superman, you’ll be the Man of Steel!
- Kneel on all fours, your knees should be hip-width apart and your hands about shoulder-width apart,
- Lift one hand, point the arm out straight in front of you,
- At the same time, extend the opposite leg behind you,
- Form one straight line from your hand to your foot (keep your hips squared to the ground),
- Hold the position for 5-10 seconds then return your hands and knees to your starting position,
- Keep the abs engaged throughout the entire exercise,
- Repeat 3-5 times for a total of 3 series on each side.
c) Bicycle Crunch
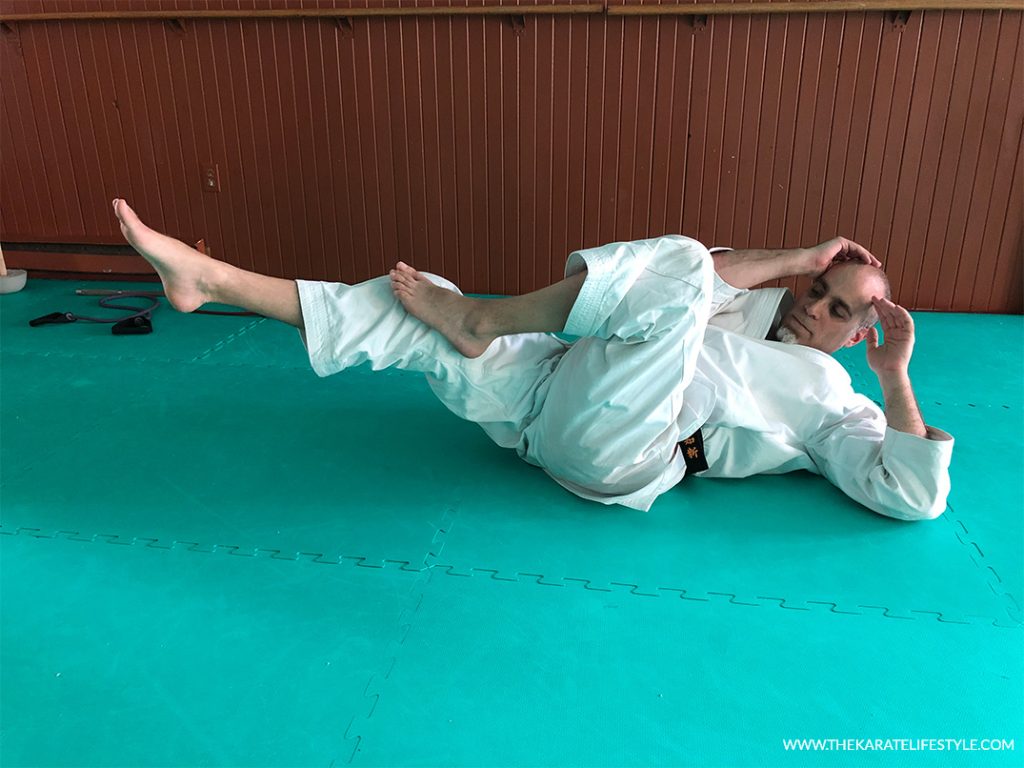
Bicycle crunches are an excellent way to target your rectus abdominis and the obliques in one single workout. Get ready for two things to happen: face-level sidekicks and an amazingly strong core!
- Lie down on the floor with your lower back and pushed to the ground,
- Put your hands behind your head neck for support, but don’t pull),
- Bring your knees in towards your chest and lift your shoulder blades off the ground,
- At the same time, extend your left leg out to about 6 inches from the ground while twisting your upper body to the right,
- Always in the same motion, bring your left elbow and touch your right knee,
- Switch sides and make the movement on the opposite side in order to complete 1 repetition.
- Do 3-5 sets of 10-15 reps.
Conclusion
Like most things worth pursuing, improving your body to kick higher takes some time and effort. That being said, if you work on it diligently and regularly – ideally every single day – you’ll be amazed at how much you’ll improve every week.
Make them part of your morning and evening routine and avoid as much as possible skipping a day. After a month or so, you’ll see a significant improvement on both your flexibility and strength and you’ll definitely kick higher than you did before!
- 10 Ways Meditation can Improve Your Karate - March 6, 2024
- Is Tai Chi Effective for Self-Defense? - February 16, 2024
- Do You Need to Add Ground Grappling Into Your Karate? - February 15, 2024

